
(This document serves as an example of setting up a TOP608BT RTK GNSS receiver for an Windows 10/11 laptop. If you have a different USB/Bluetooth RTK GNSS receiver, there might be slight variations, but the overall process should remain similar.)
System requirements:
- Windows 10 / 11 Laptop with Internet connection (Internet usually can be acquired by using a cell phone’s wifi hotspot. Cell phones can be 3G, 4G LTE or 5G, Don’t worry about high cellular bandwidth requirements; even 1-2 KB/second is sufficient.)
- RTK capable USB or Bluetooth GNSS Receiver
- NTRIP Server login info(which provide RTK correction data)
- NTRIP Server/Caster IP address or / full qualify domain name
- Port number
- userid
- password
- NTRIP Client for Windows(For example, Lefebure NTRIP client)

Connection Instructions:
Section A:
Pairing the bluetooth GNSS receiver (step 1 – 5).
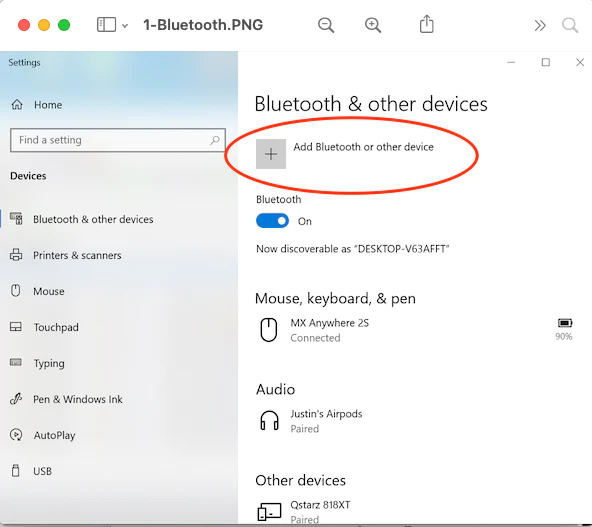
To begin, navigate to your Windows 10/11 operating system and follow these steps:
- Click on the Start button.
- Select Settings.
- Choose Devices.
- Click on Bluetooth & other devices.
- Finally, click on “Add Bluetooth or other device”.
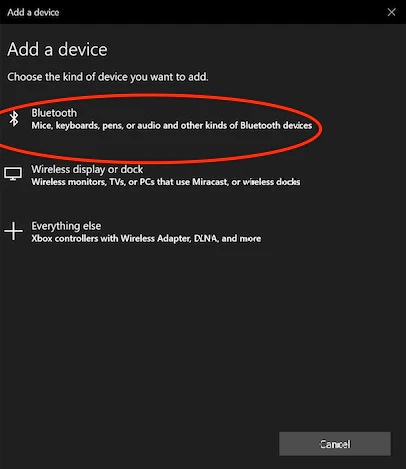
2. Click on “Bluetooth – Mice, keyboards, pens, or audio and other kinds of Bluetooth devices”.
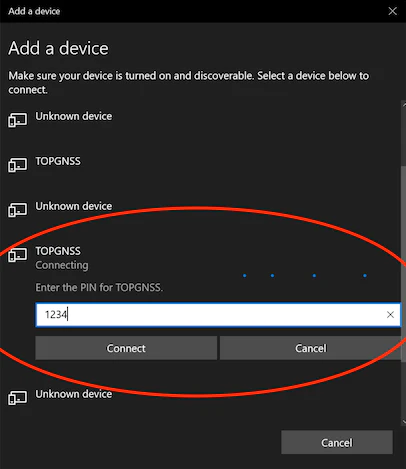
3. Windows will scan for available Bluetooth devices. Connect the RTK GNSS receiver (TOP608BT) by plugging it into a power source, such as a computer’s USB port or a power bank charger. Look for the device named “TOPGNSS” on the screen and click on it. You will be prompted to enter a PIN; please enter “1234” and click the “Connect” button.
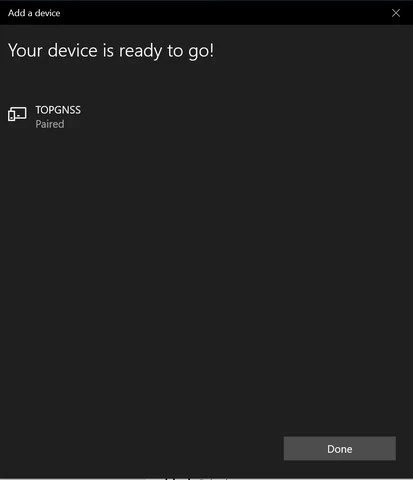
4. Now Windows has successfully connected to the RTK GNSS receiver via Bluetooth. You should now see the message “Your device is ready to go!” displayed on the screen.
5. To confirm the successful pairing of the Bluetooth RTK GNSS receiver with your Windows 10 laptop, follow these steps:
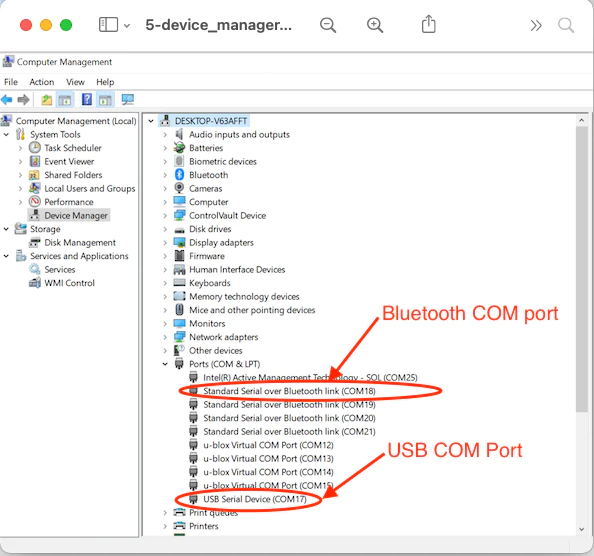
- Open the “Device Manager.”
- Navigate to “Ports (COM & LPT)” section.
- Look for the newly added entry “Standard Serial Over Bluetooth link (COMxx).” Its presence indicates a successful pairing between the GNSS receiver and your laptop.
Additionally, since the TOP608BT RTK GNSS receiver has dual interfaces (Bluetooth and USB), Windows will automatically add the USB interface as well. You can locate it in the Device Manager as “USB Serial Device (COMxx).”
Section B:
Install and configure NTRIP client. (step 6 – 12).
6. Download the NTRIPClient.exe file from lefebure.com.
http://lefebure.com/software/ntripclient/
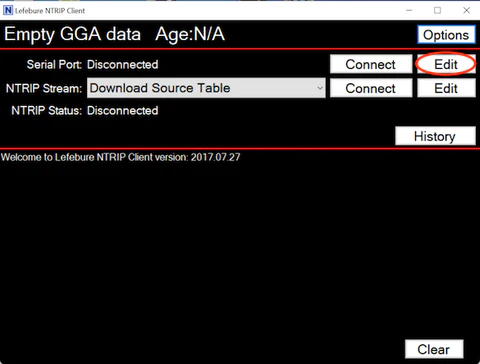
Double-click on the NTRIPClient.exe file to launch it. The Lefebure NTRIP Client interface will appear, resembling the screenshot below. Click on the “Edit” button located on the “Serial Port” row.
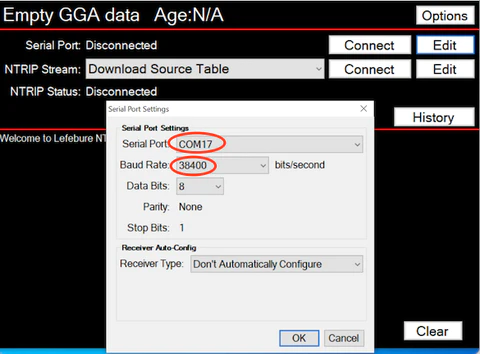
7. In the “Serial Port” section, select the “USB COM port” that corresponds to the one shown in the diagram from step 5. Choose a baud rate of 38400. Once done, click “OK”.
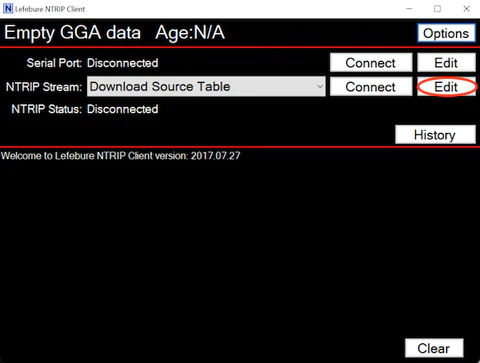
8. Click the “Edit” button on the NTRIP Stream row.
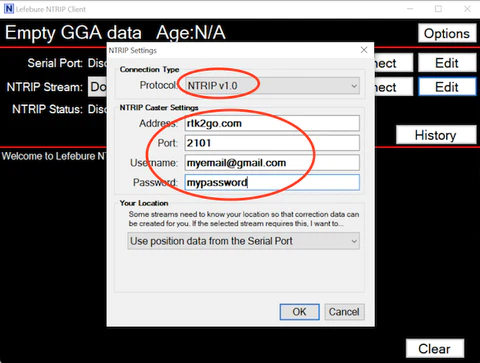
9. Select or Key in the below settings:
Protocol: NTRIP v1.0.
NTRIP Caster Setting:
- Address: the NTRIP server / caster IP address / fully qualified domain name.
- Port: the NTRIP server / Caster port number.
- Username: from your NTRIP service provider.
- Password: from your NTRIP service provider.
And press “OK” button.
For the above, you need a NTRIP caster login account to continue. If you don’t have one yet, please obtain an account before proceeding. Here are some resources for NTRIP correction services where you can acquire an NTRIP account according to your preference.
- Rtk2go (free service, world wide coverage)
- UNAVCO (free service, US coverage)
- A List of Public RTK Base Stations in the U.S.
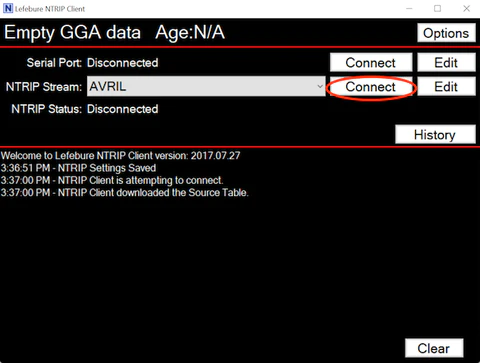
10. Once you’re finished, click the “connect” button. If the NTRIP configuration key is correct, the NTRIP service provider will provide a list of available streams. Choose the mount point (stream) that is closest to your current location. You can find the mount points on the website of your NTRIP service provider.
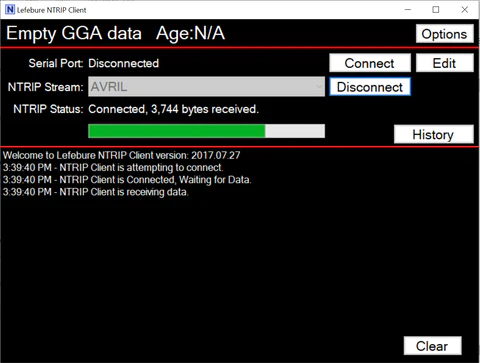
11. On the main screen of the Lefebure NTRIP client, you’ll see a progress bar that indicates the download of correction data (RTCM) from the NTRIP caster to your Windows laptop. To continue the download to your RTK GNSS receiver, press the “Connect” button in the “Serial Port” row. The correction data (RTCM) will then be transferred from your Windows laptop to the RTK GNSS receiver via the USB port.
12. If your RTK GNSS receiver is in an open sky area, you may notice a change in the Fix mode from “FloatRTK” to “RTK” in approximately one minute.
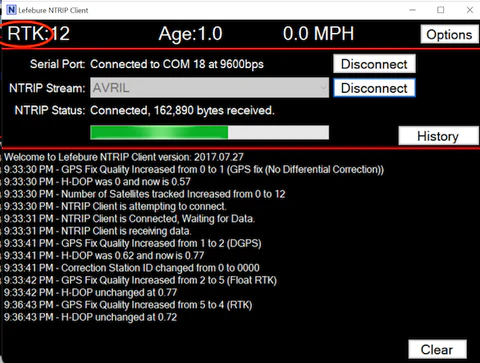
Congratulations! Your RTK GNSS receiver has been successfully set up on your Windows 10/11. You can now start using it to provide highly accurate location data to the applications on your machine.
We have tested the below Bluetooth RTK GPS/GNSS receivers
- TOP608BT
- Columbus EX-1
- Columbus P-70 Ultra
- Navisys GR-903
- GeoAstra RTB609BT
- GeoAstra RTU609BT
- GeoAstra RTU608BT
- X8-M1
work with this instruction.
If you’re looking for a RTK / PPK GNSS Receiver above, you can purchase it from:
https://gpswebshop.com (US & WorldWide)
https://canadagps.ca (Canada)