
Prerequisites/Requirements:
- ByNav C2-M2X RTK GNSS Module EVB (Evaluation Board) – Available for purchase on our website.
- Tri-Band GNSS Antenna – Can be bought alongside the C2-M2X module from our website.
- A Windows computer with Internet access.
If you intend to set up an RTK Base, please skip Section 4.
If you want to set up an RTK Rover, skip Section 3.
1. Installation of the Driver and Configuration Tool
A. When you receive the C2, first download and install the USB driver (Please download the CH340/341 Driver Here), then connect it to a Windows computer. Next, open the Windows Device Manager. You will find two ‘USB-Enhanced-SERIAL’ ports listed under ‘Ports (COM & LPT)’. Refer to the screenshot below for an example:
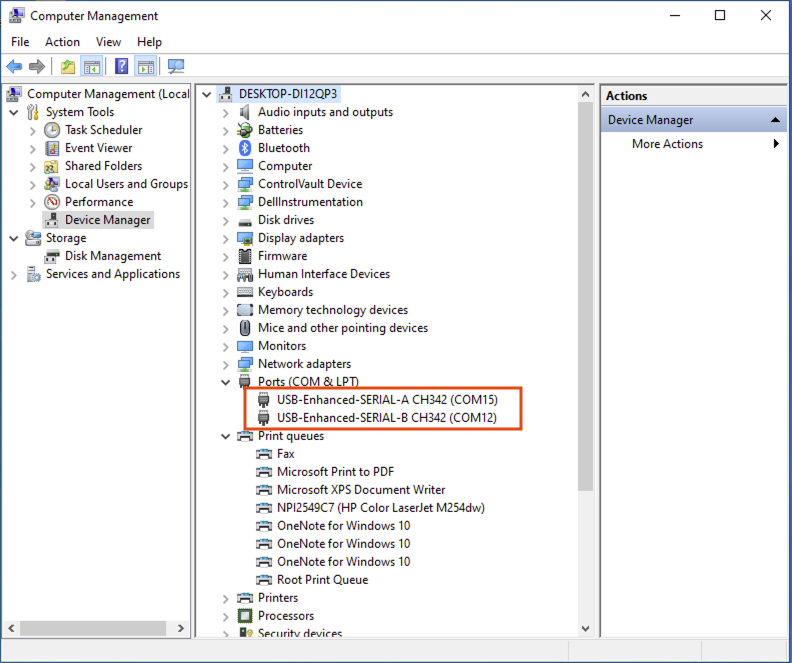
In our example, the C2 is recognized as two COM ports: COM12 and COM15. (Note that the COM port numbers on your computer may differ.) Please record these two COM port numbers, as you will need them for later steps in these instructions.
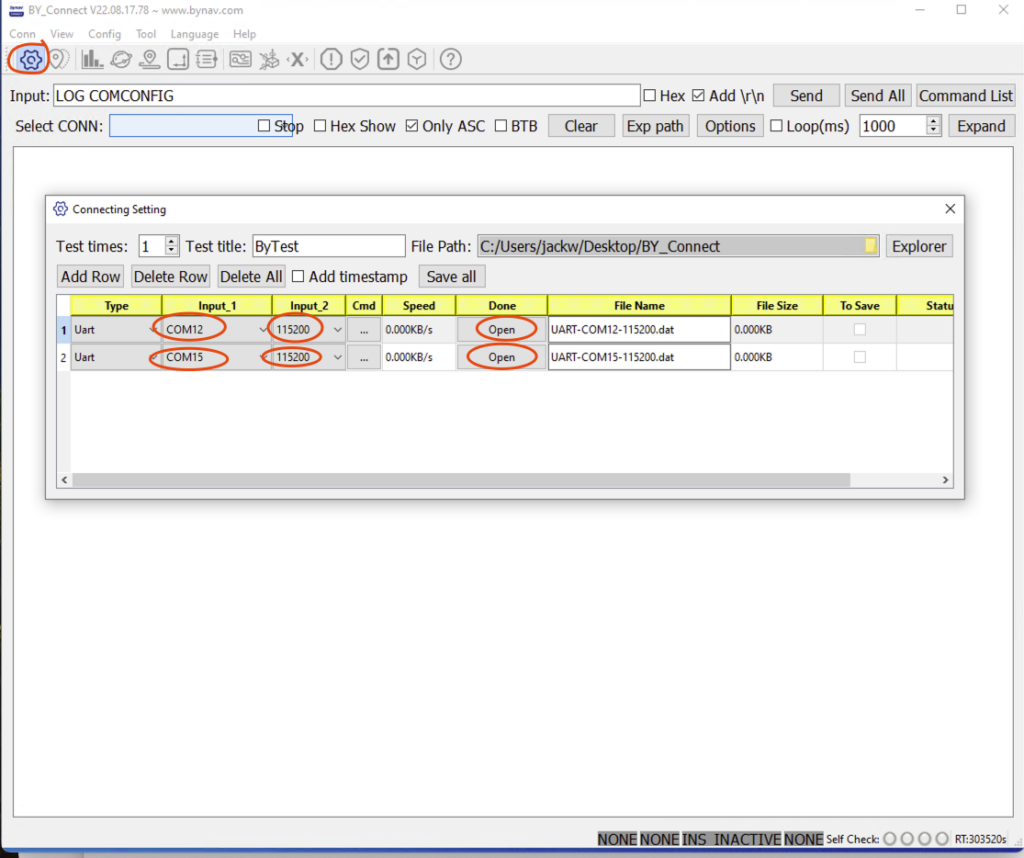
B. Download and install the By_connect software from the ByNav official download page. Once installed, launch the software and click on the ‘Connection Setting’ button. Select the COM port numbers you noted down in step A for the ‘Input_1’ column in both lines 1 and 2. For our example, we chose COM12 and COM15. Then, select ‘11520’ for the ‘Input_2’ column. In the ‘Done’ column, select ‘Open’.
2. Identifying Your Internal and External COM Ports
For the C2-M2X evaluation board, understanding the distinction between internal and external COM ports is essential. The internal COM port, which is not directly exposed externally, requires mapping to an external COM port for external accessibility. The external COM port is the one that your computer recognizes as part of the C2-M2X board, and it is typically displayed in the ‘Device Manager.’
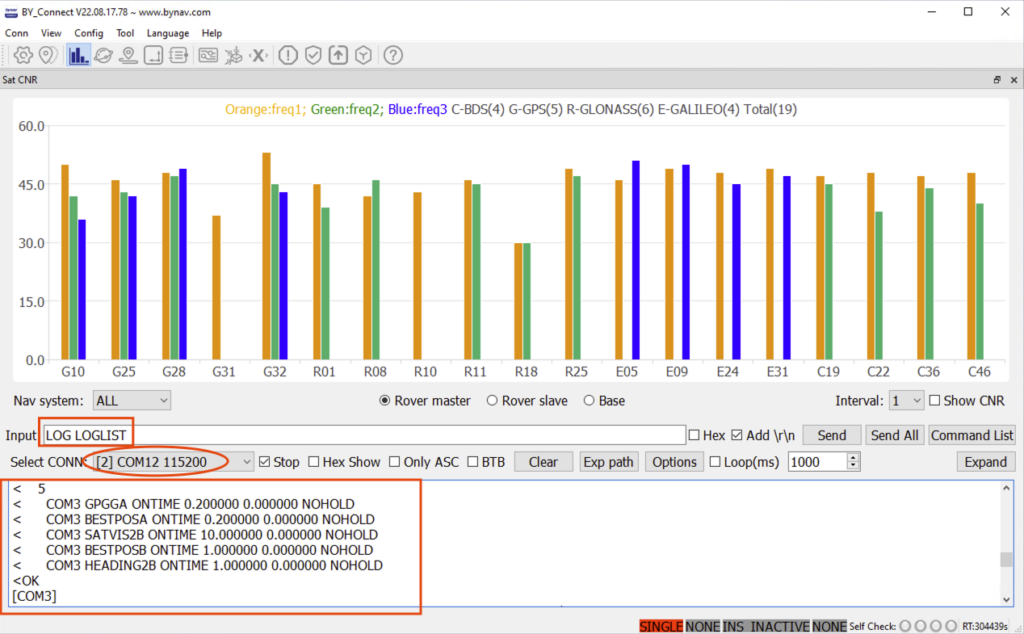
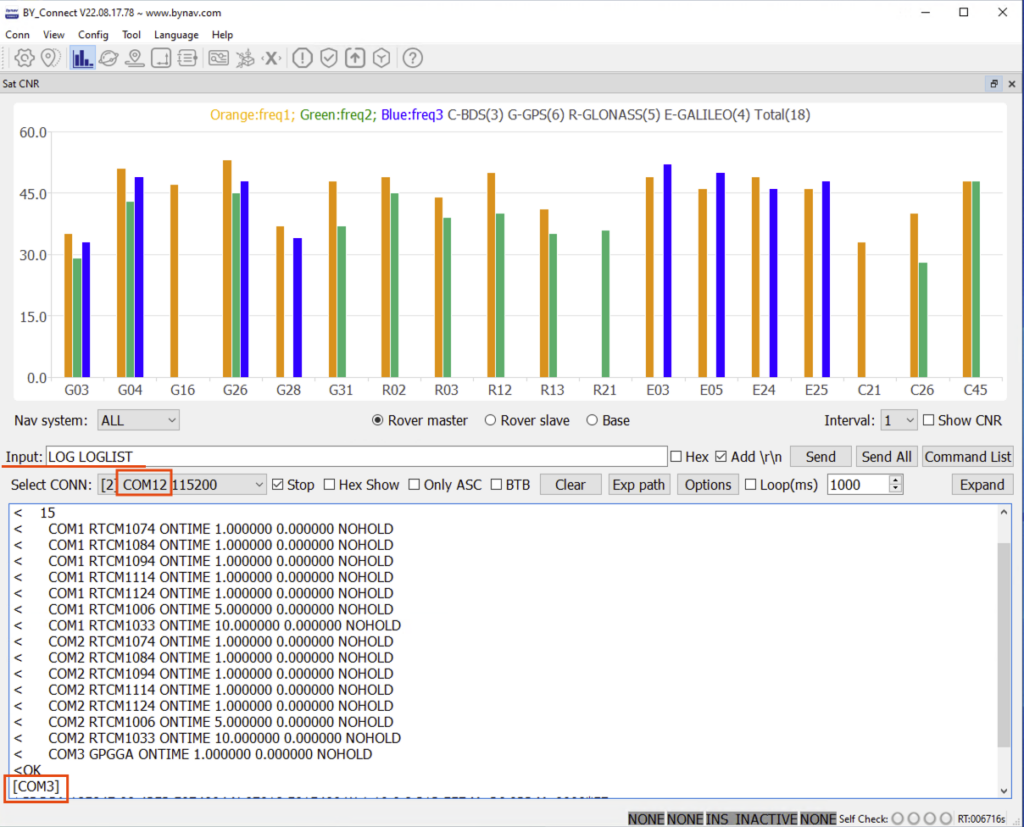
Each external COM port maps directly to an internal COM port. To ascertain which internal COM port is mapped to an external one, use the By_connect software. In the ‘Select CONN:’ dropdown menu, select one of the two COM ports displayed. For example, I initially chose COM12. Enter the command ‘LOG LOGLIST’ in the input box and press ‘Enter.’ The resulting output will reveal an internal COM port number that maps to this external COM port (COM12).
Please refer to the screenshot provided below. In our example, it indicates COM3, which appears in the line just below the ‘<OK’ prompt. Here, it’s shown that the external COM port COM12 is mapped to the internal COM port COM3.
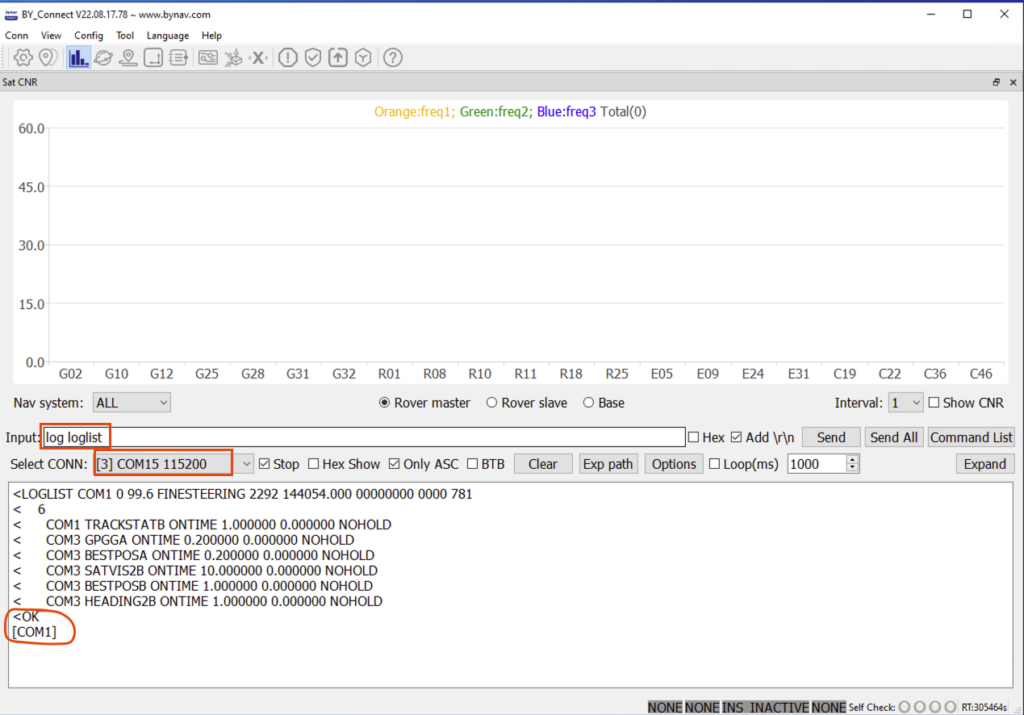
Then, using the ‘Select CONN’ dropdown menu again, choose the other COM port (COM15) and repeat the process. In this instance, it will reveal that the internal ‘COM1’ is mapped to the external ‘COM15’.
3. Configuring the C2-M2X Board as an RTK Base
(If you wish to configure the C2-M2X as an RTK Rover, please skip this section and proceed directly to Section 4.)
To set up the C2-M2X board as an RTK Base GNSS receiver, simply choose one of the two internal COM ports at random and configure it for RTCM protocol and messages. In my case, I selected the internal COM port COM1 for RTCM protocol and message. Below is the template for the necessary commands.
FRESET
RTKTYPE BASE
LOG COMX RTCM1074 ONTIME 1
LOG COMX RTCM1084 ONTIME 1
LOG COMX RTCM1094 ONTIME 1
LOG COMX RTCM1114 ONTIME 1
LOG COMX RTCM1124 ONTIME 1
LOG COMX RTCM1006 ONTIME 5
LOG COMX RTCM1033 ONTIME 10
INTERFACEMODE COMX RTCM RTCM
SAVECONFIG
REBOOT
We need to replace ‘COMX’ with ‘COM1’ in the code below. After updating, the code will appear as follows:
FRESET
RTKTYPE BASE
LOG COM1 RTCM1074 ONTIME 1
LOG COM1 RTCM1084 ONTIME 1
LOG COM1 RTCM1094 ONTIME 1
LOG COM1 RTCM1114 ONTIME 1
LOG COM1 RTCM1124 ONTIME 1
LOG COM1 RTCM1006 ONTIME 5
LOG COM1 RTCM1033 ONTIME 10
INTERFACEMODE COM1 RTCM RTCM
SAVECONFIG
REBOOT
Let’s execute the code to complete the configuration.
A. Copy and paste the following two commands into the input box of the By_connect software 1 by 1, then press Enter to execute them individually. These commands will reset the C2-M2X to default configure and reboot it, then switch the C2-M2X to RTK Base mode.
FRESET
RTKTYPE BASE
B. Copy and paste the command block provided below into the input box of the By_connect software. Press Enter to execute the commands. This will configure RTCM messages to the internal COM port COM1 and force it to utilize the RTCM protocol.
LOG COM1 RTCM1074 ONTIME 1
LOG COM1 RTCM1084 ONTIME 1
LOG COM1 RTCM1094 ONTIME 1
LOG COM1 RTCM1114 ONTIME 1
LOG COM1 RTCM1124 ONTIME 1
LOG COM1 RTCM1006 ONTIME 5
LOG COM1 RTCM1033 ONTIME 10
INTERFACEMODE COM1 RTCM RTCM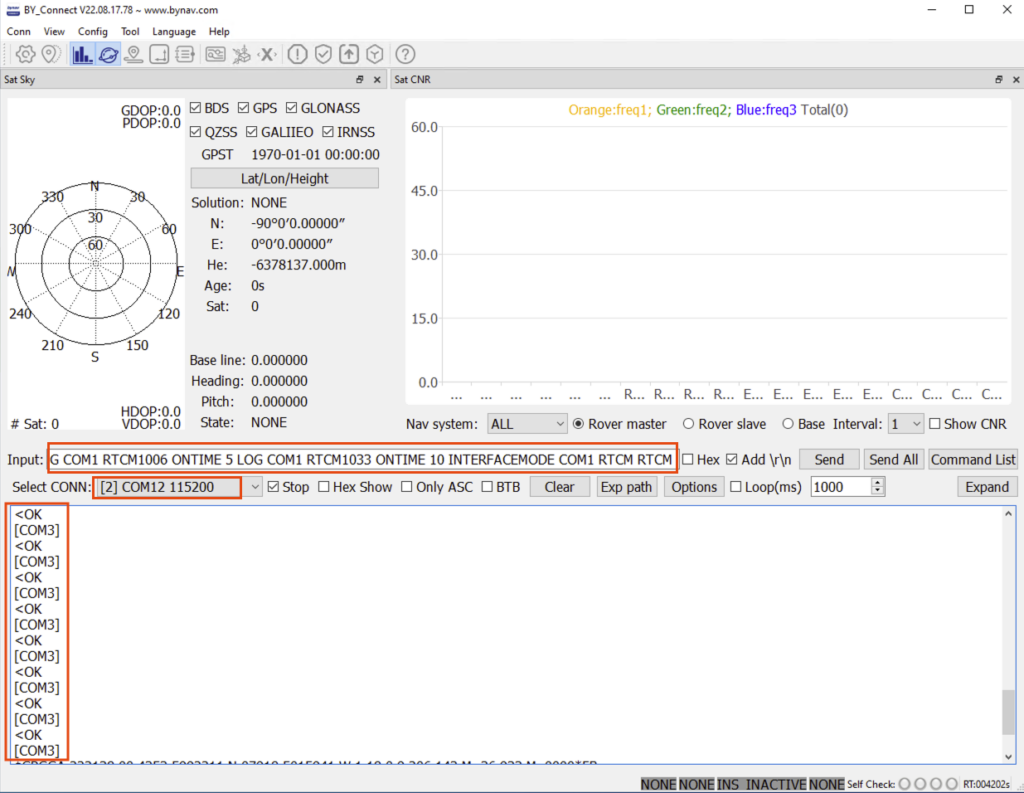
C. Finally, execute the following two commands, which will save the configuration and restart the C2-M2X board.
SAVECONFIG
REBOOT
Your C2-M2X is now operational as an RTK Base GNSS Receiver and is ready for use.
If you need to stream the RTK base data to an NTRIP caster, the STRSVR program from RTKlib can be used as the NTRIP server. For detailed instructions, please refer to the document titled “Build Your Very Own NTRIP Infrastructure.” In our setup above, since we have configured the internal COM port COM1 (mapped to the external COM port COM15) to output RTCM correction data, we should use serial port COM15 as input serial port in the mentioned document.
D. Fix Position (Optional)
If you’ve already obtained the RTK base coordinates through other methods, you can manually input the known position using the FIX command. Please refer to the Interface Protocol document, Section 3.22, pages 48–49, for details.
You can use commands such as the following:
FIX POSITION Latitude Longitude GeodeticHeight
SAVECONFIG
REBOOT
For example:
FIX POSITION 28.234042909 112.888089727 91.0662
SAVECONFIG
REBOOT
4. Configuring the C2-M2X Board as an RTK Rover
(If you wish to configure the C2-M2X as an RTK Base, please skip this section.)
To set up the C2-M2X as an RTK Rover, you need to select one internal COM port to output NMEA data, and another internal COM port for RTCM correction data. In my case, I chose internal COM port COM3 for NMEA output and COM1 for RTCM data. Below is the template for the necessary commands.
FRESET
RTKTYPE ROVER
LOG COMX GPGGA ONTIME 0.2
LOG COMX BESTPOSA ONTIME 0.2
INTERFACEMODE COMY RTCM RTCM
SAVECONFIG
REBOOT
We need to replace ‘COMX’ with ‘COM1’ and ‘COMY’ with ‘COM3’. After updating, the block of code will appear as follows:
FRESET
RTKTYOE ROVER
LOG COM3 GPGGA ONTIME 0.2
LOG COM3 BESTPOSA ONTIME 0.2
INTERFACEMODE COM1 RTCM RTCM
SAVECONFIG
REBOOT
Let’s execute the code to complete the configuration.
A. Copy and paste the following two commands into the input box of the By_connect software, then press Enter to execute them. These commands will reset C2-M2X to default configuration and reboot it, then switch the C2-M2X to RTK Rover mode.
FRESET
RTKTYPE ROVER
B. Copy and paste the command block provided below into the input box of the By_connect software. Press Enter to run the commands. This will set up RTCM protocol on the internal COM port COM1 and configure the output of certain NMEA messages on the internal COM port COM3.
LOG COM3 GPGGA ONTIME 0.2
LOG COM3 BESTPOSA ONTIME 0.2
INTERFACEMODE COM1 RTCM RTCM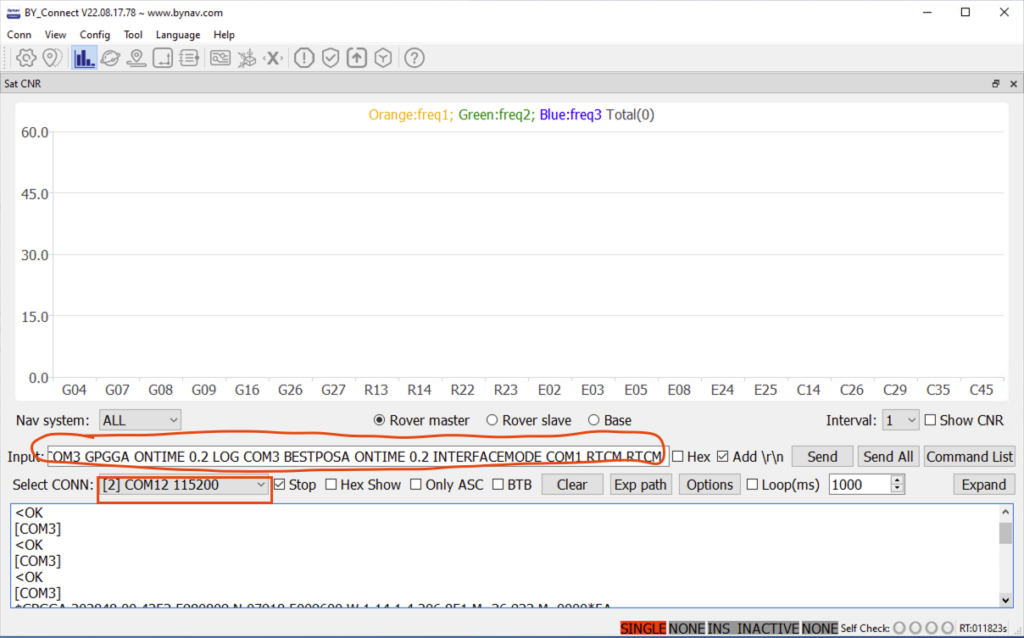
C. Finally, execute the following two commands, which will save the configuration and restart the C2-M2X board.
SAVECONFIG
REBOOT
Now, your C2 is functioning as an RTK Rover.
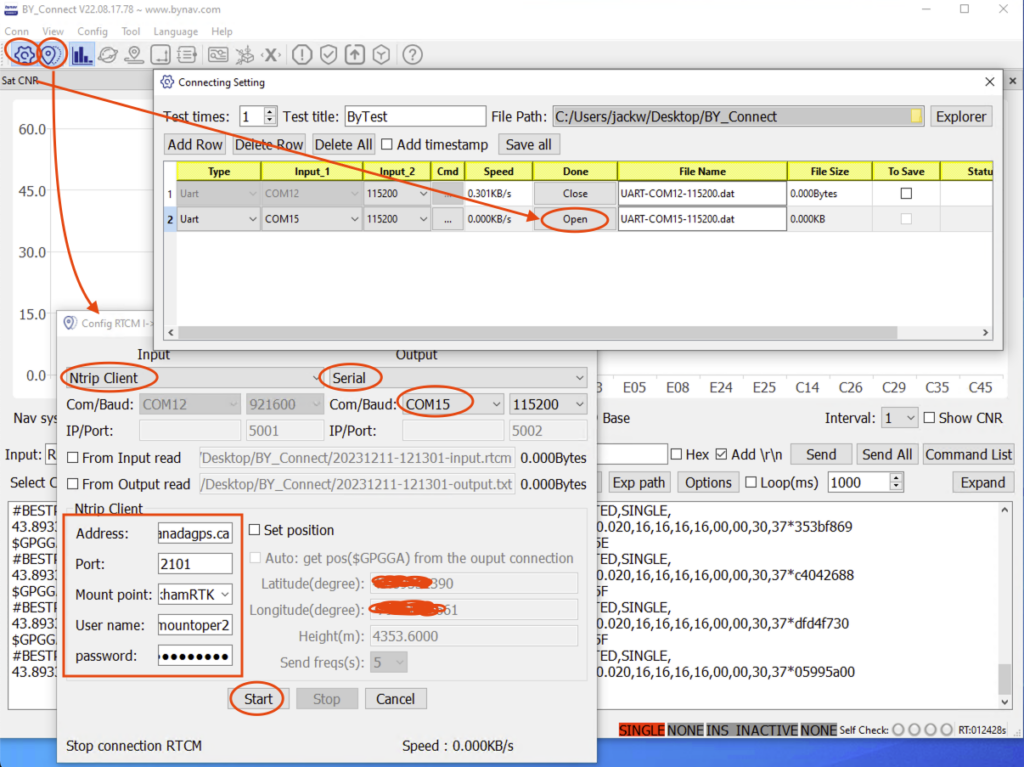
To test it, go to the ‘Connection Setting’ and open the NMEA port (which is COM12 in this instance), while closing the RTCM COM port (COM15 in my case). Click on the ‘Config RTCM’ button and set up the NTRIP Client settings. The settings are from your NTRIP Caster provider, and the external COM port (COM15 in our case). Press the ‘Start’ button once you’ve completed these steps.
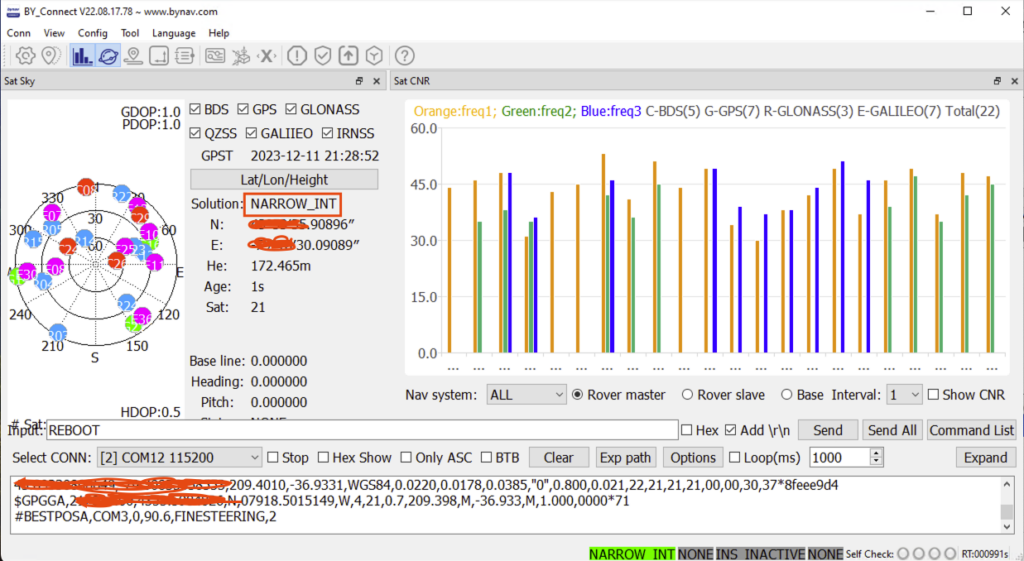
You will soon see the solution status change to ‘NARROW_INT,’ indicating an RTK fixed position. Please refer to the screenshot below for reference.
5. Optional information
The following 3 commands are very useful for configuring or troubleshooting the C2-M2X board.
A. The ‘Log loglist‘ command provides valuable information, including which messages are configured to output from which internal port. It also indicates which internal COM port is mapped to the selected external COM port. For instance, as shown in the screenshot below, the external COM port COM12 is mapped to the internal COM port COM3.
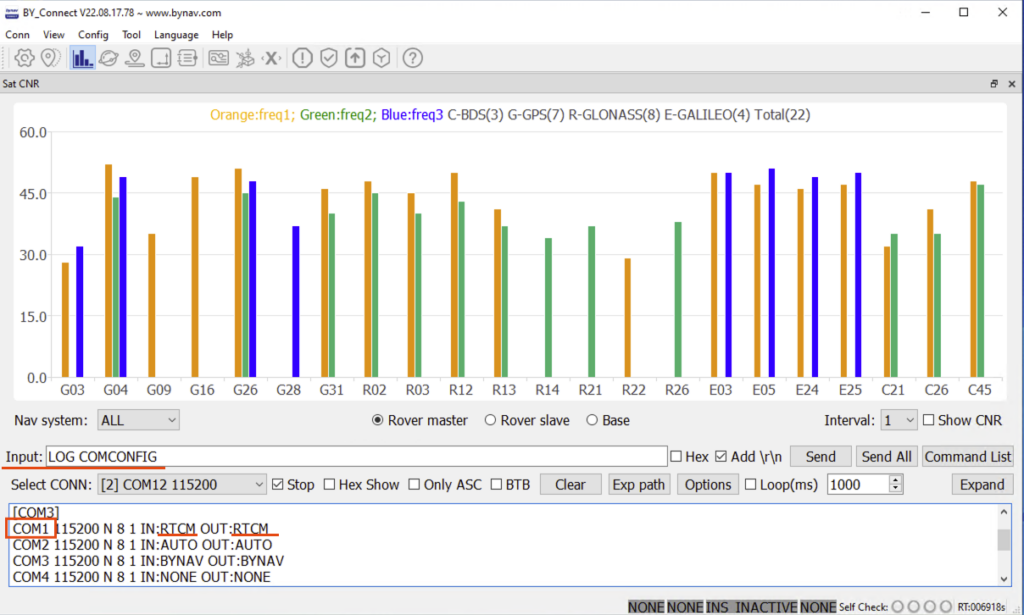
B. The ‘Log comconfig‘ command is used to query the internal COM port’s baud rate, input, and output protocols. For instance, the screenshot below illustrates that for the internal port COM1, both the input and output protocol are set to RTCM.
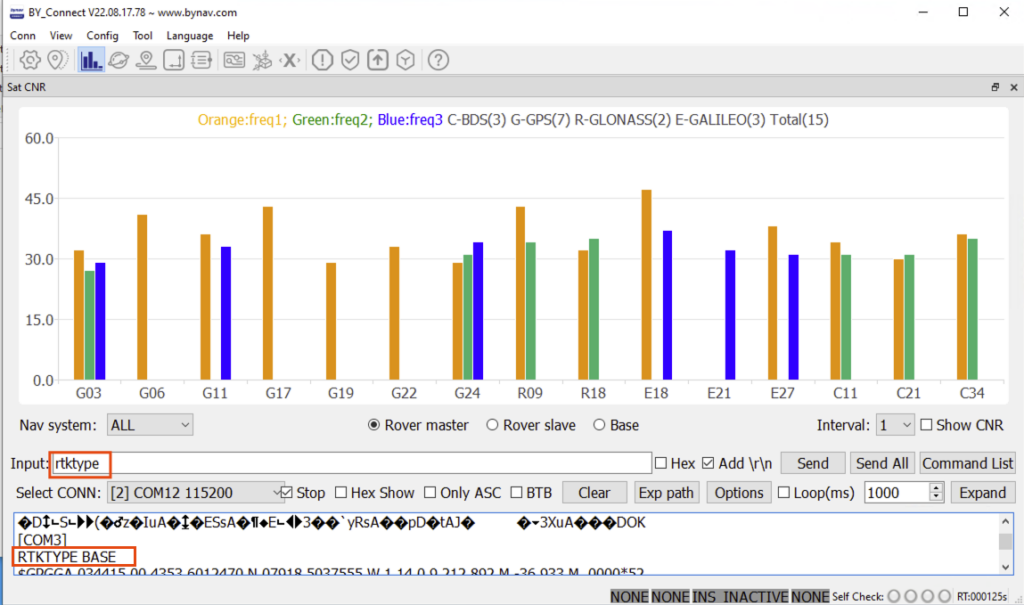
C. The ‘rtktype‘ command is used to determine the current operational mode of the C2-M2X, whether as an RTK Base or RTK Rover. Please see the example in the screenshot below:
ByNav C2-M2X RTK GNSS Module can be purchased from:
https://gpswebshop.com (US & WorldWide)
https://canadagps.ca (Canada)