System requirements:
- Android phone / tablet with Internet connection (typically cellular based, 3G, 4G LTE or 5G, only requires 1-2 KB/second)
- RTK capable GNSS Receiver (This guide use the TOP608BT , if you’re using a different model of RTK GNSS receiver, there could be some minor differences, but the general process should be similar.)
- NTRIP Server login info(which provide RTK correction data)
- NTRIP Server/Caster IP address or / full qualify domain name
- Port number
- userid
- password
- NTRIP Client on Android(For example, Lefebure NTRIP client)
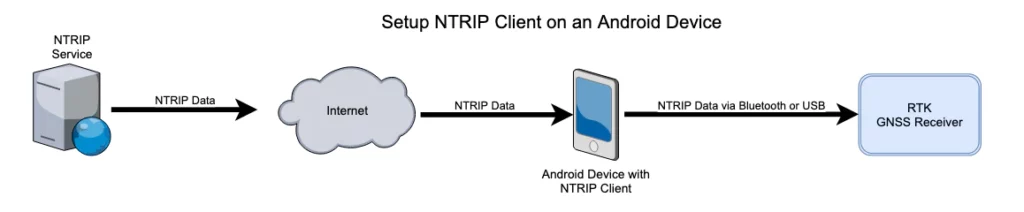
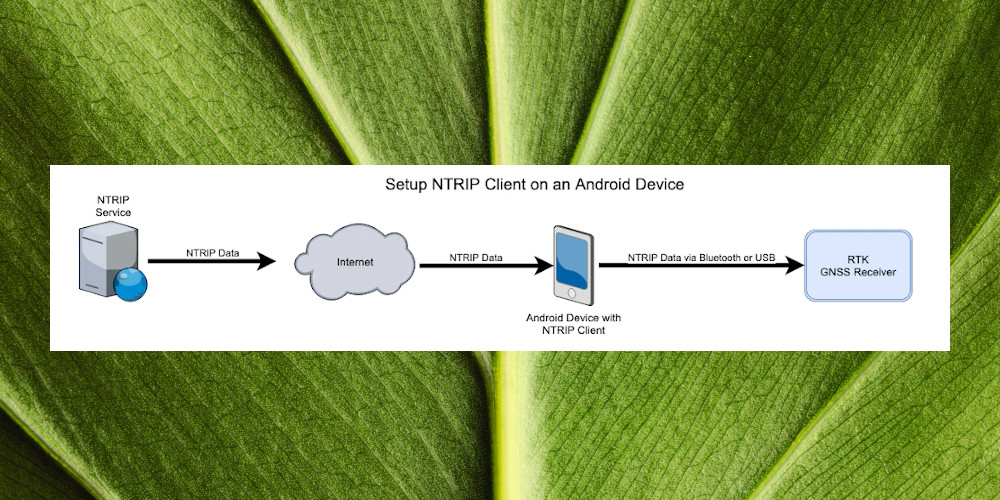
Connection Instructions:
Section A:
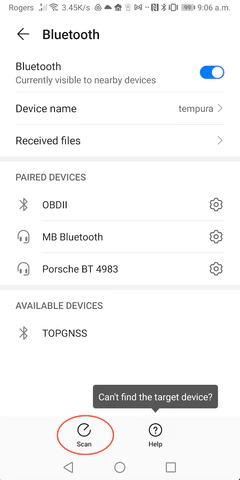
Pairing the bluetooth GNSS receiver (step 1 – 3).
- On your Android device, navigate to Settings, then select Device Connection, followed by Bluetooth. Look for the option labeled Available Devices, where you should find your Bluetooth GNSS receiver. In case it’s not visible, try scanning for the device.
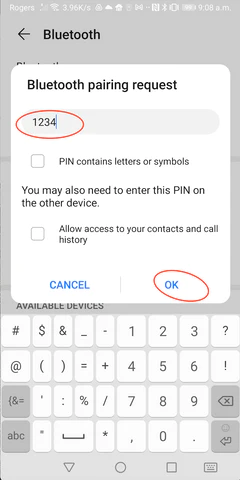
2. Simply tap on the GNSS receiver (labeled as “TOPGNSS” in the screenshot below) from the list of available devices. This action will trigger a Bluetooth pairing request. Enter the PIN code as “1234” and tap the “ok” button to proceed.
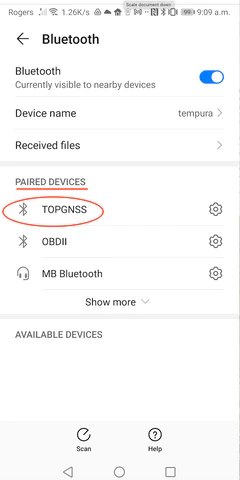
3. Your Android device has successfully paired with the GNSS receiver (identified as “TOPGNSS” in the screenshot below).
Section B:
Install NTRIP Client. (step 4)
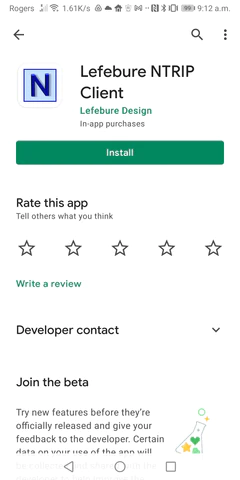
4. Head over to the Google Play Store on your Android device and install the “Lefebure NTRIP Client” app.
Section C:
Config the Lefebure NTRIP Client. (Step 5 – 13)
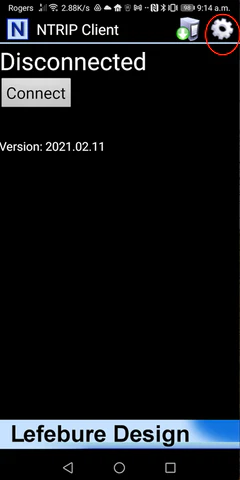
5. Open the “Lefebure NTRIP Client” app and tap on the “gear” icon.
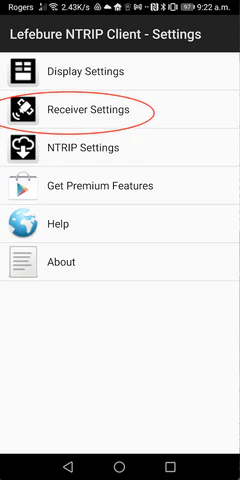
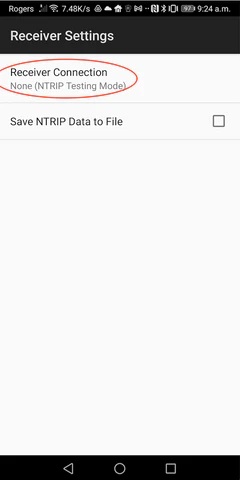
6. Select “Receiver Settings”.
7. Select “Receiver connection”.
8. Select”External via Bluetooth”.

9. Select “TOPGNSS”.
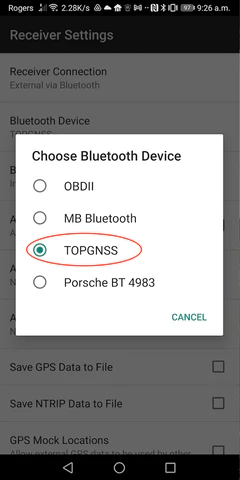
Please remember to enable the “GPS Mock Location” setting if you want to share the RTK GNSS location data with other apps on your Android device.
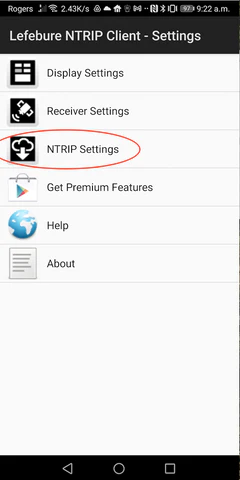
10. Go back one level in the menu to access the “Lefebure NTRIP Client-Settings” menu. From there, choose “NTRIP Settings”.
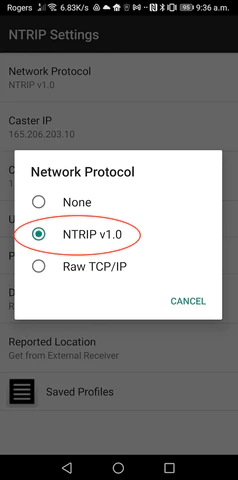
11. Select “Receiver Connection”.

12. Select “NTRIP v1.0”.
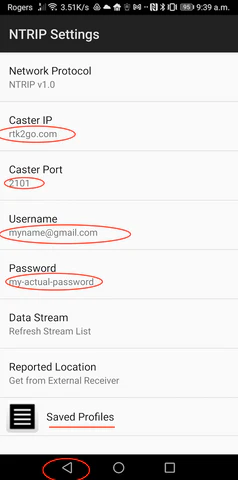
13. Key in the below settings:
- Caster IP: the NTRIP server / caster IP address / fully qualified domain name.
- Caster Port: the NTRIP server / Caster port number.
- Username: from your NTRIP service provider.
- Password: from your NTRIP service provider.
You can save these settings into a profile by select “Saved Profiles”
To proceed further, you will need a NTRIP caster login account. If you don’t have one yet, please obtain an account before proceeding. Here are some resources for NTRIP correction services where you can acquire an NTRIP account according to your preference.
- Rtk2go (free service, world wide coverage)
- UNAVCO (free service, US coverage)
- A List of Public RTK Base Stations in the U.S.
Section D:
Stream the NTRIP correction data from the NTRIP caster to the Android device, and then to the TOP608BT RTK GNSS Receiver. (Follow steps 14-17 to complete the process.)
14. Once you have completed the previous steps, return to the main screen of the NTRIP Client and press the “connect” button.

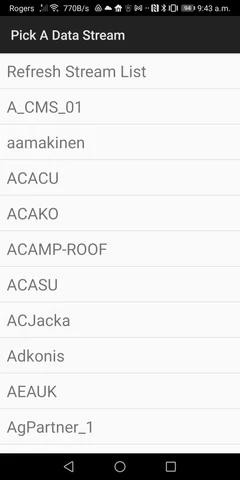
15. If you have correctly configured the NTRIP settings, the NTRIP service provider will provide a stream list as shown below. Select the mount point (stream) that is closest to your current location. You can obtain the list of mount points from your NTRIP service provider’s website.
16. On the NTRIP client main screen, you will see a progress bar indicating the download of correction data (RTCM) from the NTRIP caster to the RTK GNSS receiver through the Android device.
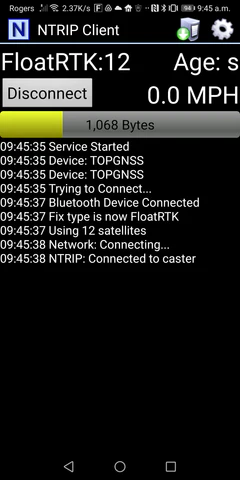
17. If your RTK GNSS receiver is located in an open sky area, you may notice a change in the Fix mode from “FloatRTK” to “RTK” in approximately one minute.
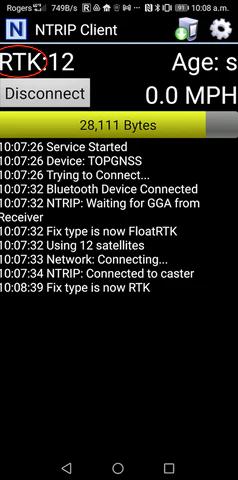
Congratulations! Your RTK GNSS receiver has been set up successfully.
We have tested the below Bluetooth RTK GPS/GNSS receivers
work with this instruction.
If you’re looking for a RTK / PPK GNSS Receiver above, you can purchase it from:
https://gpswebshop.com (US & WorldWide)
https://canadagps.ca (Canada)