
This document is somewhat outdated. We've recently (Nov 27, 2023) published a new blog post titled "Build your very own NTRIP RTK Base with just an RTK GNSS Receiver and 5 minutes" which serves as an updated replacement. In my view, this new guide is far simpler and doesn't require any licensed NTRIP software, making it my recommended choice. Unless you have a specific need to use SNIP software as your NTRIP Server and rtk2go.com as your NTRIP Caster, you may disregard this older document.Assuming you have already set up your own operational RTK base station, if not, please follow our blog post guide on
“How to setup an RTK Base station using a USB / Bluetooth RTK GNSS Receiver?”
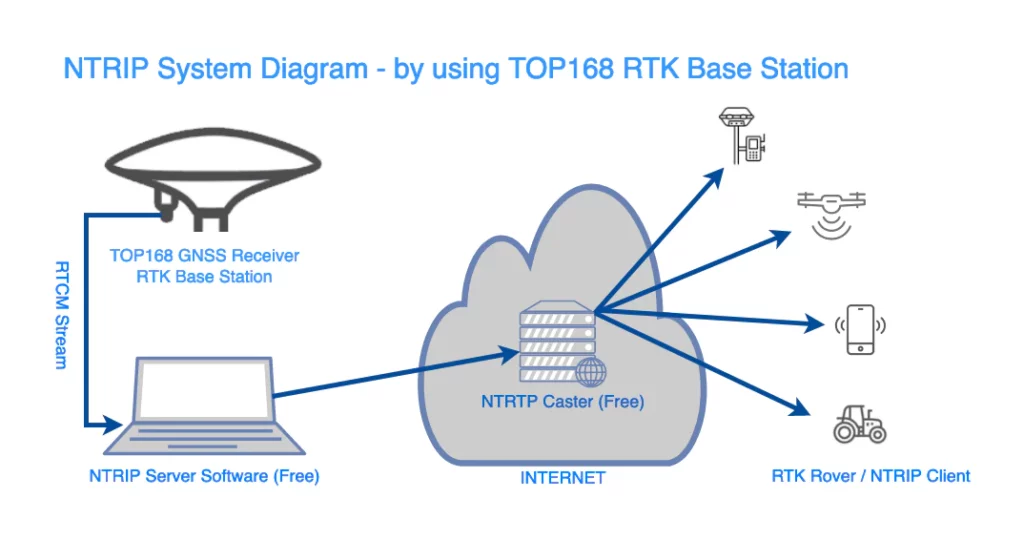
Before proceeding, NTRIP, the industry standard for streaming RTCM correction data over the internet, allows your RTK rovers to access these correction data as long as they have internet/network connectivity. I have discovered a simple, direct, and free method to implement this. Please refer to the system diagram below for a clear understanding.
1. Download the free SNIP software.
SNIP is a software called NTRIP Caster that allows anyone, from a hobbyist with one device to a large GNSS network operator with many devices, to easily set up and run their own caster. You can download it from their official website: https://www.use-snip.com/
SNIP software offers Lite, basic, and Pro license options. The Lite license is completely free to use for a lifetime. With the Lite license, you can run up to 3 RTK base stations and an unlimited number of RTK rovers (NTRIP clients).
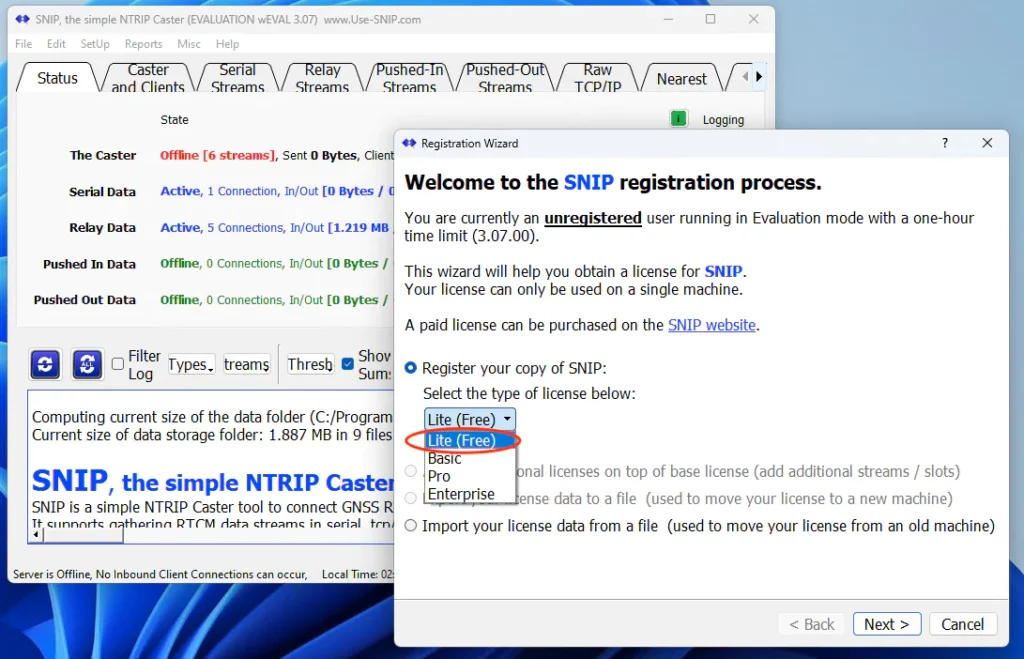
After installing SNIP, it will be in UNREGISTERED mode by default. I recommend registering it as a “Lite” license right from the beginning. Otherwise, your stream will be terminated after running for 1 hour. To register, go to the SNIP Menu, click on Help, then select Registration. Follow the Registration Wizard to register your copy of SNIP as “Lite (Free)”.
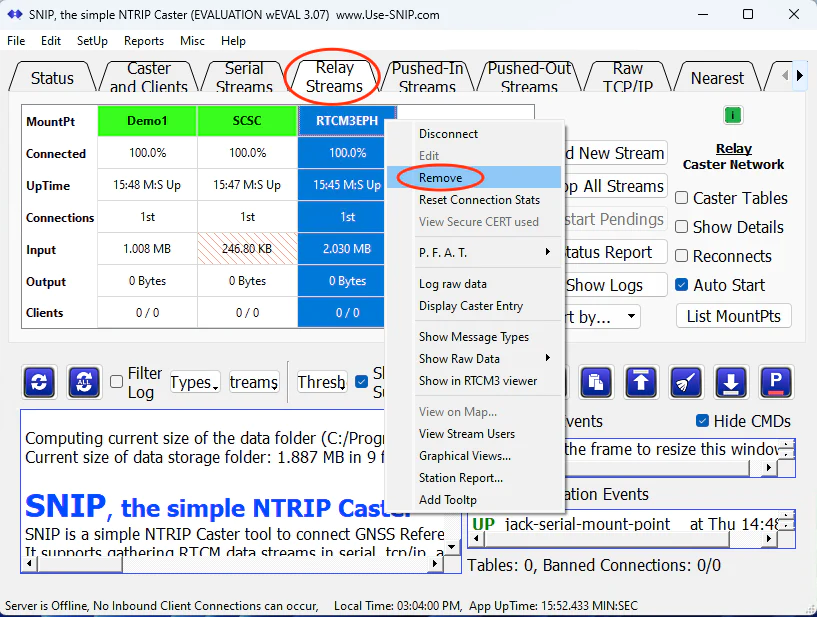
The “Lite” version of SNIP comes with 3 pre-configured Relay Streams. However, the “Lite” license only allows a maximum of 3 streams to run at the same time. Before setting up your own stream, you may need to remove 2 or more of the pre-configured Relay Streams.
To do this, please follow these steps:
- Click on the “Relay Streams” tab.
- Right-click on one of the streams.
- Select “remove” from the options.
- Click “Yes” to confirm the removal.
- Repeat these steps to remove the 2nd or even 3rd pre-configured relay streams if needed.
2. Create an input RTCM Stream from your RTK Base station
- Plug in your GNSS receiver that will be used as an RTK Base station.
- Close the SNIP software and then reopen it.
- Click on the “Serial Streams” tab.
- Click the “Add new stream” button.
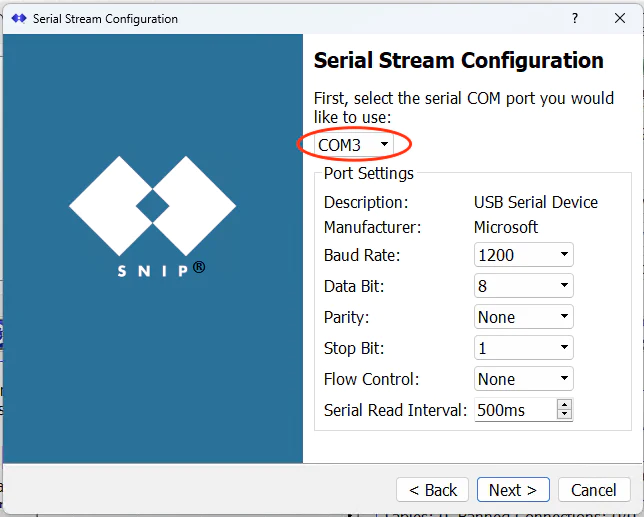
- Follow the instructions on the screen to set up the new stream.

Choose the COM port to which your GNSS receiver is connected.
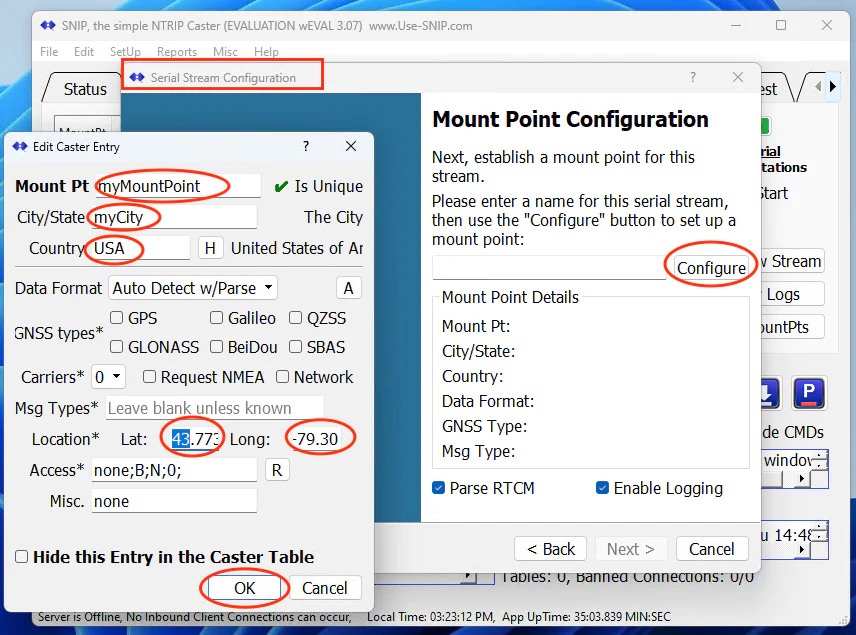
Click the “Configure” button on the “Mount point configuration” screen. This will open the “Edit Caster Entry” window. Enter the values for the following fields: “Mount Point,” “City/State,” “Country,” “Lat,” and “Long.” It’s not necessary for the Latitude and Longitude values to be extremely accurate. You can leave the default values for the remaining fields, as shown in the screenshot below. Finally, click the “OK” button to finish.
Simply follow the on-screen instructions until the serial stream is created.
3. Register a free NTRIP Caster mount point from RTK2go.com
(Apart from the RTK2go.com free NTRIP caster, you also have another choice: the Emlid NTRIP caster. It’s also free and seems to be even more convenient to use. Check it out here.)
Now it’s time to forward the RTCM correction data from the Serial Stream to the internet. To do this, you’ll need a Ntrip caster mount point. You can register a free mount point on “RTK2go,” an Internet NTRIP Caster. To proceed, please fill out and submit the “new base station reservation” form found at the link below:
http://rtk2go.com/sample-page/new-reservation/
In the form, please provide your name, email address, mount point name, and mount point password, as shown in the screenshot below. Make sure to keep this information safe, as you’ll need it later to configure your SNIP software.
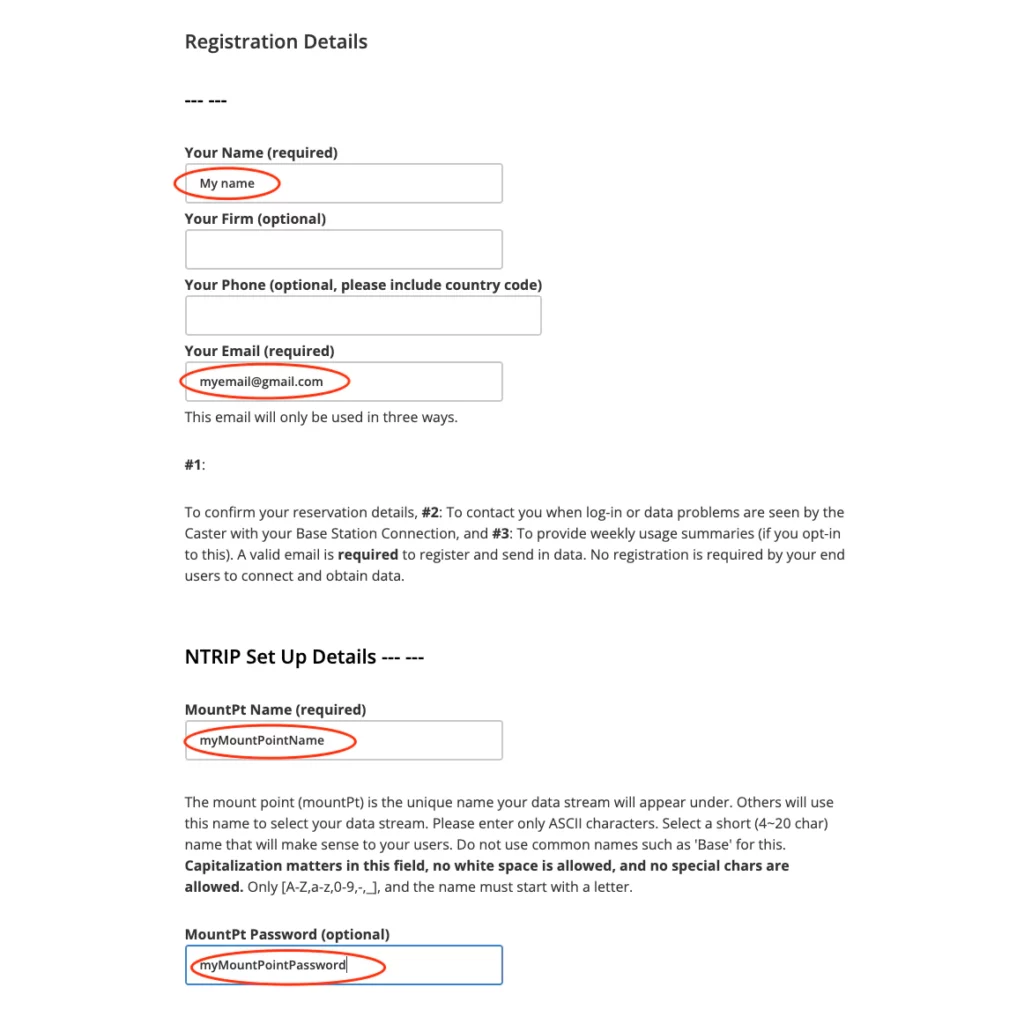
For the other fields in this form, please leave them as they are and click the “Send” button to submit.
Once you have submitted the form, you will receive an email from RTK2go shortly. To ensure that your registration is processed, please reply to the email.
You can now begin using the RTK2go mount point with the temporary password. Currently, they use “WEEK2234” as the default password, but please note that it may have been changed by the time you read this article. In any case, RTK2go will send you a permanent password via email shortly.
4. Create a RTCM output stream in SNIP software
Now, let’s return to the SNIP NTRIP caster software and navigate to the “Pushed-Out Streams” tab. Click the “Add Stream” button.
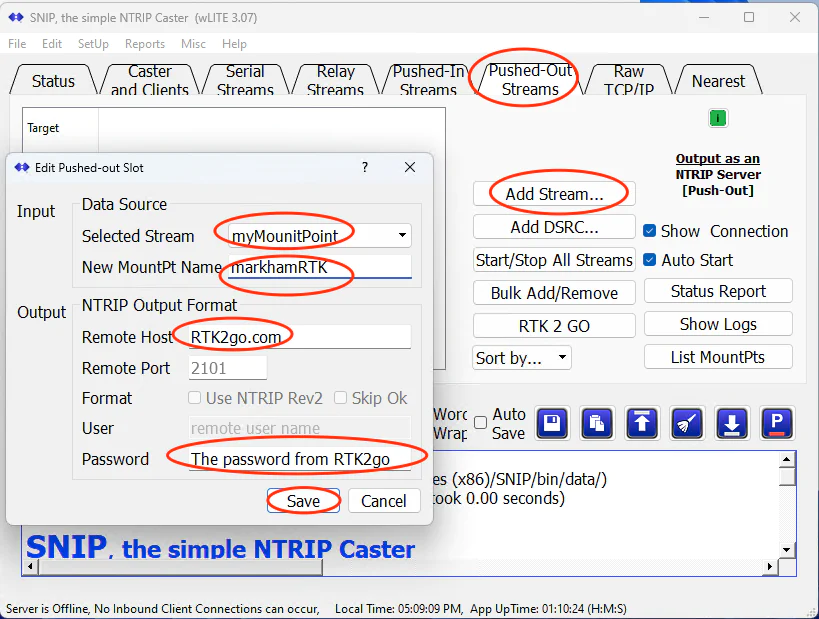
The “Edit Pushed-out Slot” window pops up. Please fill in the below fields.
“Selected Stream” – the Serial Streams which the base station GNSS receiver connects to.
“New MountPt Name” – the mount point name you submitted to RTK2go.
“Remote Host” – the RTK2go NTRIP caster URL. Please fill in “RTK2go.com”
“Password” – the password can be found from the RTK2go registration confirmation email. Before receiving the email, you could use the temporary password “WEEK2234”.
Press the “Save” button. And you will see the Pushed-Out Stream up and running.
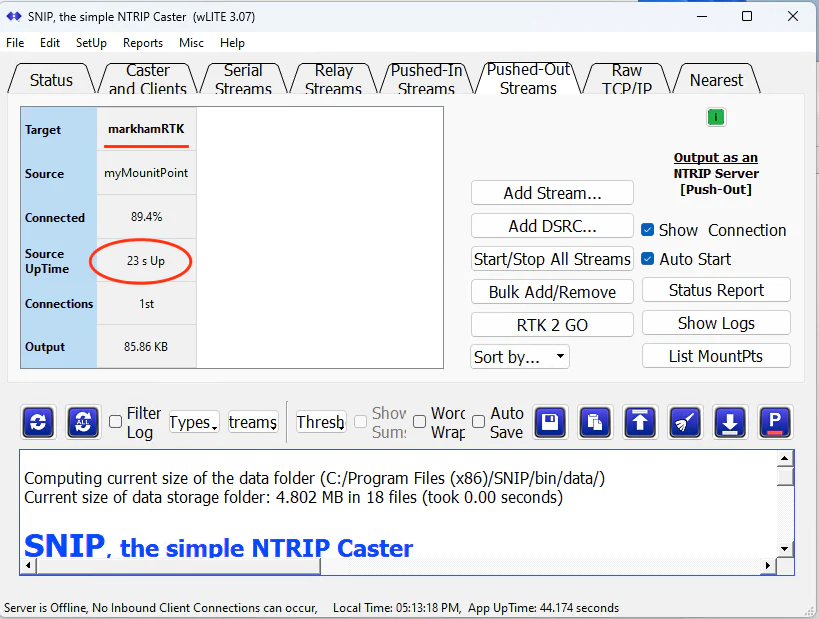
It will now start streaming RTCM correction data to the RTK2go mount point. At this stage, your personal Internet NTRIP Caster mount point is up and running, fully operational and ready to be used.
5. Verification (Optional)
This step is completely optional. If you want to confirm whether your own NTRIP Caster mount point is functioning correctly, you can connect to it using any NTRIP client.
For example, I will use another RTK GNSS receiver (TOP608BT) and u-center software as an NTRIP client (rover). In the u-center menu, go to “Receiver” and select “NTRIP Client”.
In the NTRIP client settings window, configure the NTRIP caster settings as follows:
“Address”: rtk2go.com
“Port”: 2101
“Username”: any valid email address
“Password”: it doesn’t matter. Whatever password will be fine.
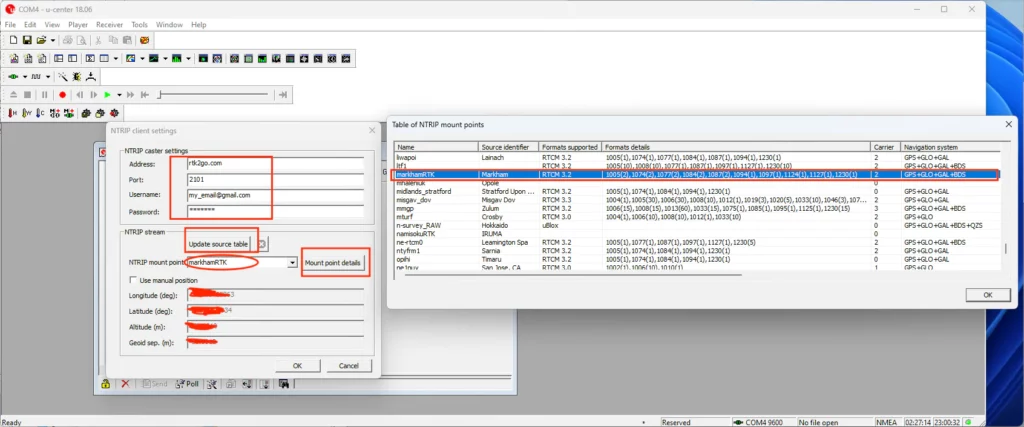
After entering the above NTRIP Caster settings, click the “Update source table” button. This will retrieve the complete list of mount points from the rtk2go.com NTRIP Caster. If you click the “Mount point details” button now, you should be able to locate your own mount point (in my case, it’s “markhamRTK”). Click “OK” to close this window.
In the “NTRIP mount point” drop-down list, make sure to select your own mount point. When you’re finished, click the “OK” button.
At this point, if the NTRIP client successfully connects to your RTK2go mount point, you will see a small green NTRIP client connection icon at the bottom of the u-center window.
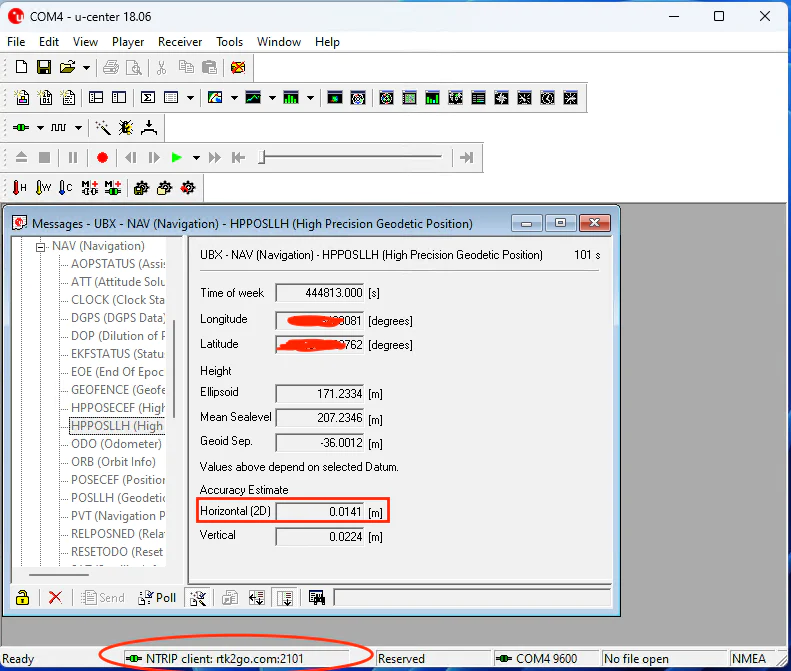
Congratulations! You now have your own free Internet NTRIP caster mount point operational. This could be the NTRIP caster that is closest to your location. The RTCM correction data it sends can greatly enhance the accuracy of your nearby rovers. In my case, it resulted in a horizontal accuracy of 0.0141 meters.
PS – In practice, you don’t need to continuously maintain the RTCM data stream to your RTK2go mount point. This means you don’t have to keep your computer running all the time. Your mount point will not be deleted, so you can start the stream whenever you need it. Once the RTCM stream data is received, the RTK2go mount point will be immediately operational.
If you’re looking for a RTK Base Station GNSS Receiver, you can purchase it from:
https://gpswebshop.com (US & WorldWide)
https://canadagps.ca (Canada)