How to change the Update Rate of a Navisys GR-U01 (u-blox M10) GNSS Receiver?
Quote from GPSWebShop Official on August 14, 2024, 11:52 amStep 1: Install and Launch u-center 2
1.Download and install the latest version of u-center 2 from the u-blox website.
2.Connect your GR-U01 GNSS receiver to your computer via USB or serial connection.
3.Open the u-center 2 application.
Step 2: Connect to the GNSS Receiver
1. In u-center 2, go to the “Devices” tab or the connection panel.
2.Select the correct COM port where your GNSS receiver is connected.
3. Click on “Connect” to establish communication with the GNSS receiver.
Step 3: Access Configuration View
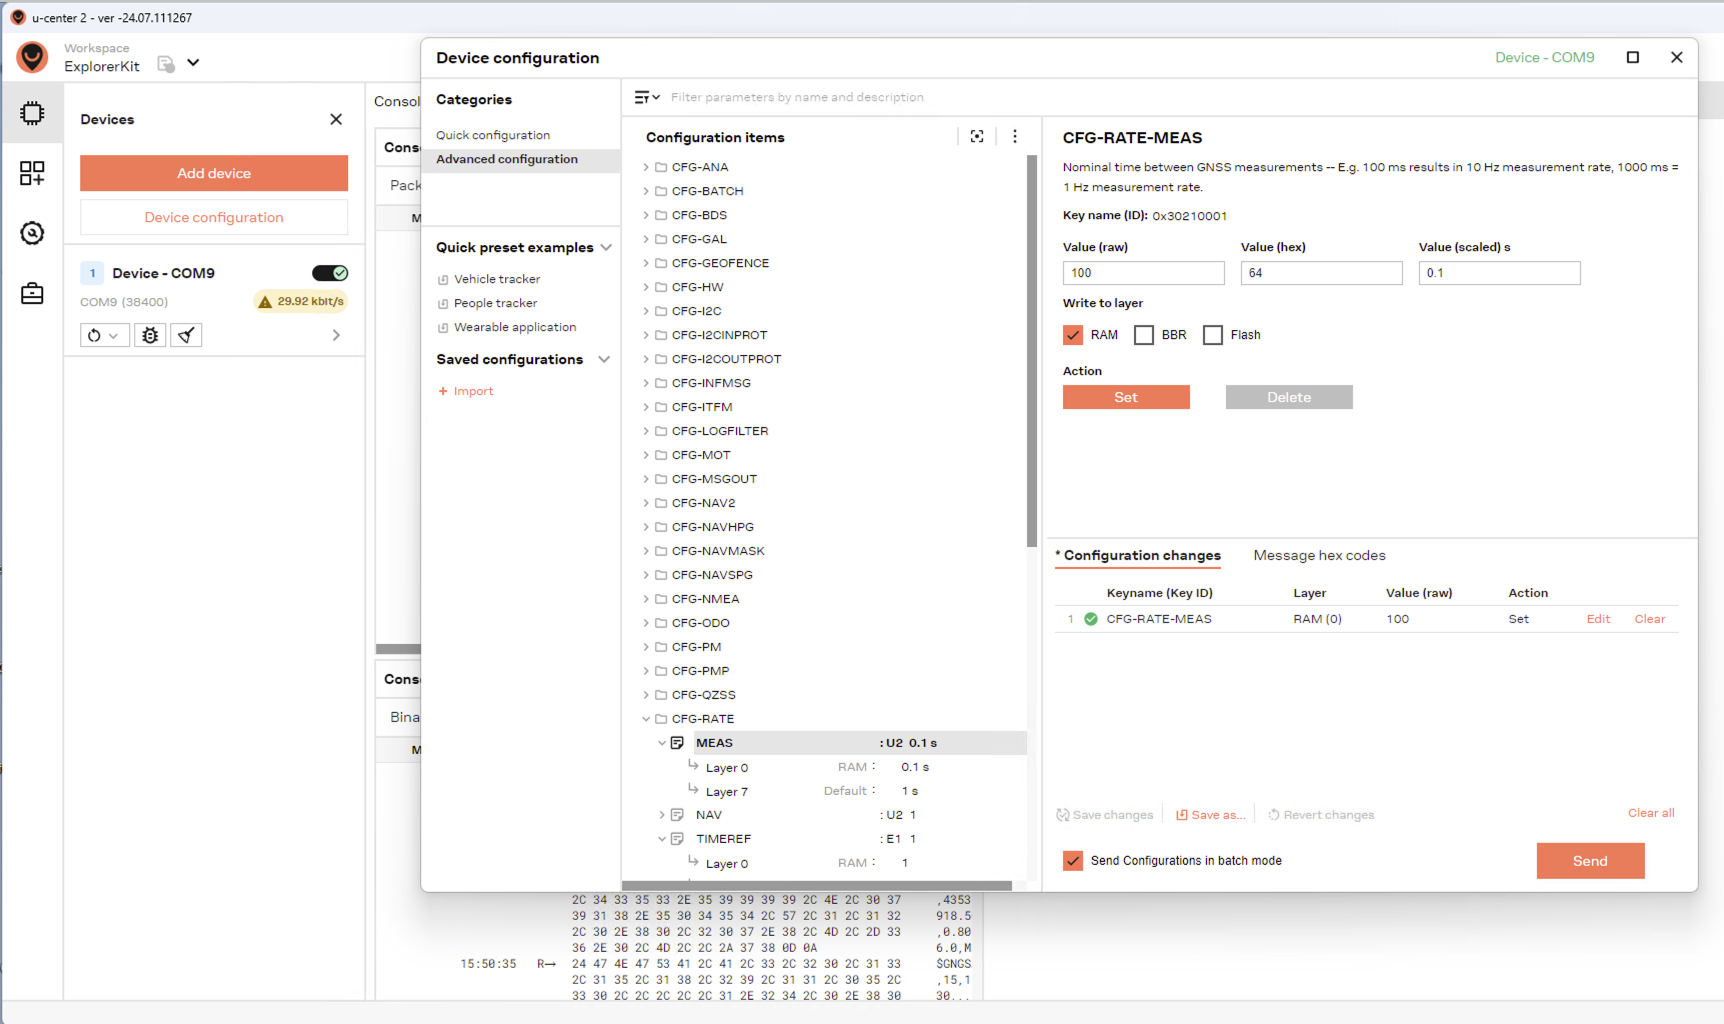
1. Once connected, navigate to the “Device configuration” panel by selecting it on the left side of the interface.
2. Under “Advanced configuration”, find and expand the “CFG-RATE” section in the configuration tree.
3. Select “MEAS” (Measurement Rate), as shown in the screenshot you provided.
Step 4: Set the Update Rate
1. In the “CFG-RATE-MEAS” section, you’ll see fields for “Value (raw)”, “Value (hex)”, and “Value (scaled)”.
•Value (raw) corresponds to the measurement period in milliseconds.
•For example, to set a 10 Hz update rate, set the Value (raw) to 100 ms.
2.After entering the desired value, you have the option to write this configuration to different layers:
• RAM: Stores the configuration temporarily until the device is powered off.
•BBR (Battery-Backed RAM): Stores the configuration in battery-backed RAM, which retains the settings even when the device is powered off.
•Flash: Permanently stores the configuration in the device’s flash memory, ensuring that the settings are retained even after power cycling.
Step 5: Apply the Configuration
1.After selecting the appropriate layer(s) (e.g., RAM, BBR, Flash), click “Set” to apply the changes to the GNSS receiver.
2.You can verify the update by observing the update rate on the u-center 2 interface or by checking the output messages.
Step 6: Verify the Update Rate
1.You can monitor the GNSS data to confirm that the receiver is now operating at the desired update rate.
2.Check the output in the “Message View” or any other relevant data display in u-center 2 to ensure the update rate is correct.
Step 1: Install and Launch u-center 2
1.Download and install the latest version of u-center 2 from the u-blox website.
2.Connect your GR-U01 GNSS receiver to your computer via USB or serial connection.
3.Open the u-center 2 application.
Step 2: Connect to the GNSS Receiver
1. In u-center 2, go to the “Devices” tab or the connection panel.
2.Select the correct COM port where your GNSS receiver is connected.
3. Click on “Connect” to establish communication with the GNSS receiver.
Step 3: Access Configuration View
1. Once connected, navigate to the “Device configuration” panel by selecting it on the left side of the interface.
2. Under “Advanced configuration”, find and expand the “CFG-RATE” section in the configuration tree.
3. Select “MEAS” (Measurement Rate), as shown in the screenshot you provided.
Step 4: Set the Update Rate
1. In the “CFG-RATE-MEAS” section, you’ll see fields for “Value (raw)”, “Value (hex)”, and “Value (scaled)”.
•Value (raw) corresponds to the measurement period in milliseconds.
•For example, to set a 10 Hz update rate, set the Value (raw) to 100 ms.
2.After entering the desired value, you have the option to write this configuration to different layers:
• RAM: Stores the configuration temporarily until the device is powered off.
•BBR (Battery-Backed RAM): Stores the configuration in battery-backed RAM, which retains the settings even when the device is powered off.
•Flash: Permanently stores the configuration in the device’s flash memory, ensuring that the settings are retained even after power cycling.
Step 5: Apply the Configuration
1.After selecting the appropriate layer(s) (e.g., RAM, BBR, Flash), click “Set” to apply the changes to the GNSS receiver.
2.You can verify the update by observing the update rate on the u-center 2 interface or by checking the output messages.
Step 6: Verify the Update Rate
1.You can monitor the GNSS data to confirm that the receiver is now operating at the desired update rate.
2.Check the output in the “Message View” or any other relevant data display in u-center 2 to ensure the update rate is correct.
Quote from anonymous on June 12, 2026, 10:01 amI changed the process and selected RAM and BBR when configuring the device. This seems to have worked, and I can now power-cycle the device while keeping the configuration.
However, if I try to select all options, the configuration fails. I’m not sure why that happens. I will be doing some additional testing today.
Thank you for the quick responses!
I changed the process and selected RAM and BBR when configuring the device. This seems to have worked, and I can now power-cycle the device while keeping the configuration.
However, if I try to select all options, the configuration fails. I’m not sure why that happens. I will be doing some additional testing today.
Thank you for the quick responses!
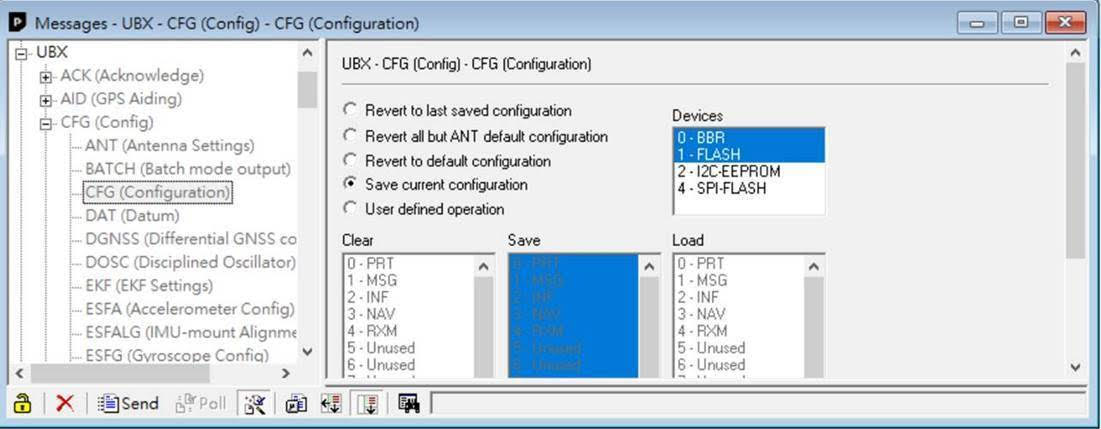
Quote from GPSWebShop Official on June 12, 2026, 10:04 amAfter making your configuration changes, you can save the settings by going to:
Messages → UBX → CFG → CFG
From there, select BBR and Flash as the save targets, then click Send, as shown in the screenshot below.
After making your configuration changes, you can save the settings by going to:
Messages → UBX → CFG → CFG
From there, select BBR and Flash as the save targets, then click Send, as shown in the screenshot below.
Quote from anonymous on June 12, 2026, 10:06 amI am currently in the field testing the GR-U01P GPS receiver, and I need it to operate at 10 Hz.
I am able to change the update rate to 10 Hz, but I am unable to save the setting to Flash memory. As a result, when the device loses power, it reverts back to the default 1 Hz setting.
Below is the screen I am seeing.
I am currently in the field testing the GR-U01P GPS receiver, and I need it to operate at 10 Hz.
I am able to change the update rate to 10 Hz, but I am unable to save the setting to Flash memory. As a result, when the device loses power, it reverts back to the default 1 Hz setting.
Below is the screen I am seeing.
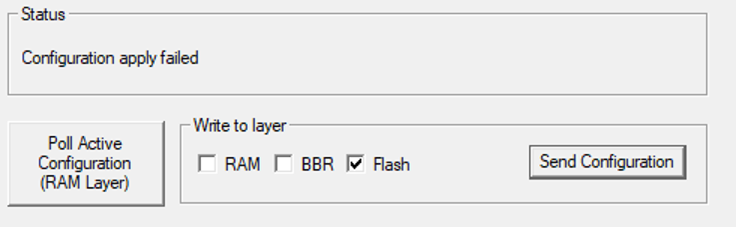
Quote from GPSWebShop Official on June 12, 2026, 10:08 amThe GR-U01 is based on the u-blox M10 chipset, which is a ROM-based receiver. Because of this, configuration changes cannot be saved permanently to Flash memory.
The settings can be saved to BBR (Battery-Backed RAM) instead. They will remain stored as long as the backup battery has sufficient power. If the backup battery is fully depleted, the receiver will restore all settings to the factory default values.
Therefore, for this receiver, BBR is the correct save option instead of Flash.
If a permanent 10 Hz setting is required, it may be possible for the factory to pre-program this specific configuration into the firmware. However, because the u-blox M10 is ROM-based, this can only be done once and cannot be changed later by the user.
The GR-U01 is based on the u-blox M10 chipset, which is a ROM-based receiver. Because of this, configuration changes cannot be saved permanently to Flash memory.
The settings can be saved to BBR (Battery-Backed RAM) instead. They will remain stored as long as the backup battery has sufficient power. If the backup battery is fully depleted, the receiver will restore all settings to the factory default values.
Therefore, for this receiver, BBR is the correct save option instead of Flash.
If a permanent 10 Hz setting is required, it may be possible for the factory to pre-program this specific configuration into the firmware. However, because the u-blox M10 is ROM-based, this can only be done once and cannot be changed later by the user.