
The accuracy of the RTK/PPK base station’s position is critical because any errors in its location will directly impact the rover’s absolute positioning accuracy. The following instructions outline how to properly configure the base location for the Columbus EX-1 in production environment.
1. Configuring the EX-1 as a Base Station Using the CONFIG.TXT File
To set up your EX-1 as a base station, you need to configure it using the CONFIG.TXT file. If you’re unsure how to load the CONFIG.TXT file onto your EX-1, please refer to the user manual for detailed instructions.
Update your CONFIG.TXT file with the following settings:
- Mode: BASE
Once you’ve updated the file, load it onto the EX-1.
To verify that the configuration was successful, check the INFO.TXT file located in the root folder of your microSD memory card to ensure it reflects the settings above.

2. Download and install the configuration tool
If you already have the “u-center” software installed, please proceed directly to section 3. If not, you will need to download it from the u-blox website at
https://www.u-blox.com/en/product/u-center
Since the Columbus EX-1 uses the F9P GNSS engine, please download u-center rather than u-center 2.
3. Configure the “Base” Location.
In the u-center menu, go to “View” → “Message View”. This will open the message view window.

In the Message View window, navigate to UBX→CFG→TMODE3. The Time mode (TMODE3) setting determines how the receiver acquires the base station’s location. You have the following three options to choose from, but typically only options 1 or 2 are used. (Option 0 disables “Base” mode and is not actually a “Base” option.)
0 – Disabled (Disable the RTK base station mode)
1 – Survey-in
2 – Fixed Mode
(Before continuing, we have a brief document that helps explain the concepts of Absolute Positioning and Relative Positioning, as well as the “Survey-in” and “Fixed Position” options. For more details, please refer to this article How accurate does your RTK base need to be?)Option 1 – “Survey-in”
You can utilize the “Survey-in” method to acquire the base station’s position. “Survey-in” involves estimating the receiver’s position by calculating a weighted mean of all valid 3D position solutions. When configuring the survey-in method, two major parameters are required.
- The “Minimum Observation Time” parameter sets the minimum duration for observations, regardless of the number of fixes used to estimate the position. The value can vary depending on the desired level of accuracy, ranging from one day for high-precision requirements to just a few minutes for rough position determination.
- The “Required Position Accuracy” parameter determines the desired absolute position accuracy for the rover.
In the EX-1 default settings, a value of 60 seconds and 5 meters is used for quick setup. However, for production use, 5 meters is too large. We recommend using a higher accuracy value.

Below is an example of using a 60-second duration and a 0.3-meter accuracy setting. To apply the settings, please click the “send” button for 2 times.

It took about 1 hour to complete the survey-in process. You can choose more accurate settings based on your project needs, balancing the required time and the desired level of accuracy.
To view the status of “Survey-in,” open the Message View window and navigate to the UBX→NAV→SVIN (Survey-in) menu. Right-click on this item and select “Enable Message” to ensure the Survey-in status updates automatically.

Please see the real-time updates for the “Survey-in” status and the accuracy level under “Mean 3D StdDev.”

When the accuracy reaches the level you specified, the survey-in process is complete. In the RTCM3 section of the Message window, you will see the 1005 message turn from a greyed-out font to solid black, indicating that the GNSS has successfully entered “Base” mode.

This is how to configure the Survey-in for EX-1 Base mode in production environment.
Option 2 – “Fixed Mode”
If you are deploying the EX-1 base station at a previously surveyed location—such as a known reference point, a point determined by RTK, a point collected through a long-term survey-in process, or another high-accuracy method—you can manually enter the location coordinates by selecting “2-Fixed Mode” from the mode dropdown list.

By checking or unchecking the “Use Lat / Long / Alt Position” option, you can choose either the LLH format (latitude, longitude, and Altitude ) or the ECEF format (ECEF-X, ECEF-Y, ECEF-Z).
Enter the Fixed Position values, and your EX-1 will enter “Base” mode right away. You will then see the 1005 message appear under the RTCM section.
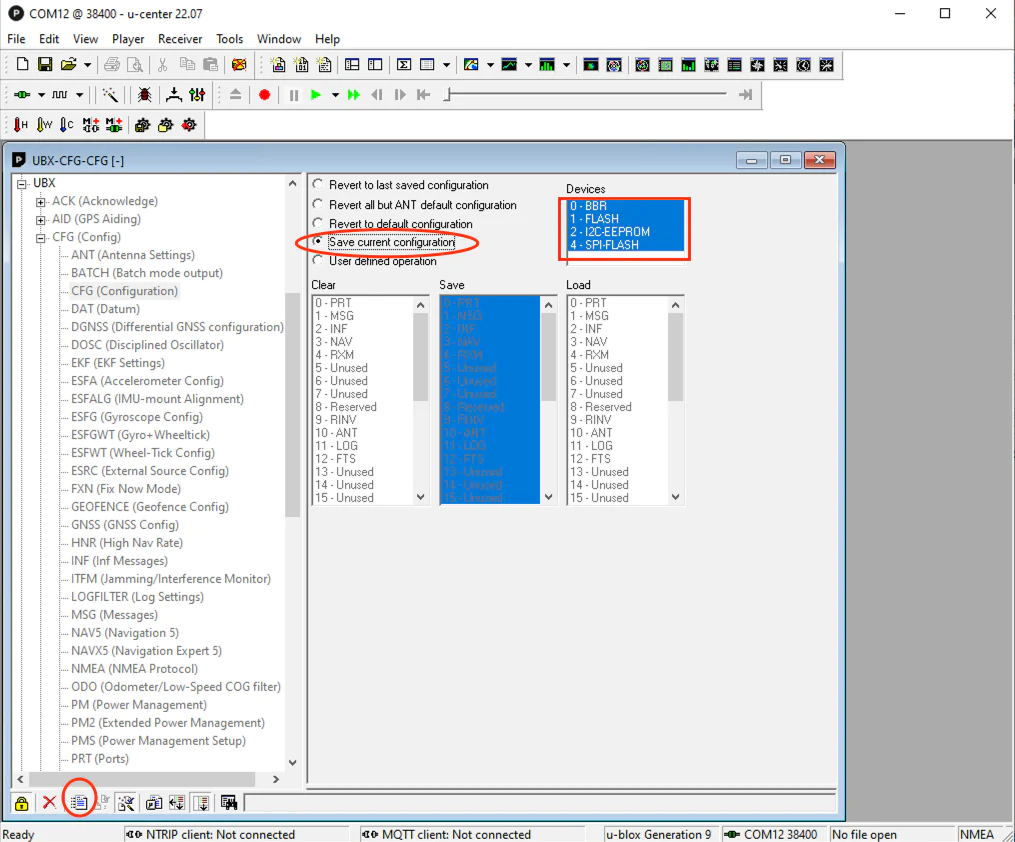
4. Save the configuration permanently
This step is crucial for saving all the settings changes made to the EX-1. Without completing this step, the EX-1 device will revert to its previous settings if it is power cycled.
In the u-center Message View window, navigate to UBX → CFG → CFG. On the right panel, select “Save current configuration” and make sure all “Devices” are highlighted. Finally, press the “Send” button twice to initiate the saving process.
Congratulations! Your Columbus EX-1 has been successfully configured as a RTK Base Station in production environment.
Columbus EX-1 can be purchased from:
https://gpswebshop.com (US & WorldWide)
https://canadagps.ca (Canada)