How to change the Update Rate of a Navisys GR-U01 (u-blox M10) GNSS Receiver?
Quote from GPSWebShop Official on August 14, 2024, 11:52 amStep 1: Install and Launch u-center 2
1.Download and install the latest version of u-center 2 from the u-blox website.
2.Connect your GR-U01 GNSS receiver to your computer via USB or serial connection.
3.Open the u-center 2 application.
Step 2: Connect to the GNSS Receiver
1. In u-center 2, go to the “Devices” tab or the connection panel.
2.Select the correct COM port where your GNSS receiver is connected.
3. Click on “Connect” to establish communication with the GNSS receiver.
Step 3: Access Configuration View
1. Once connected, navigate to the “Device configuration” panel by selecting it on the left side of the interface.
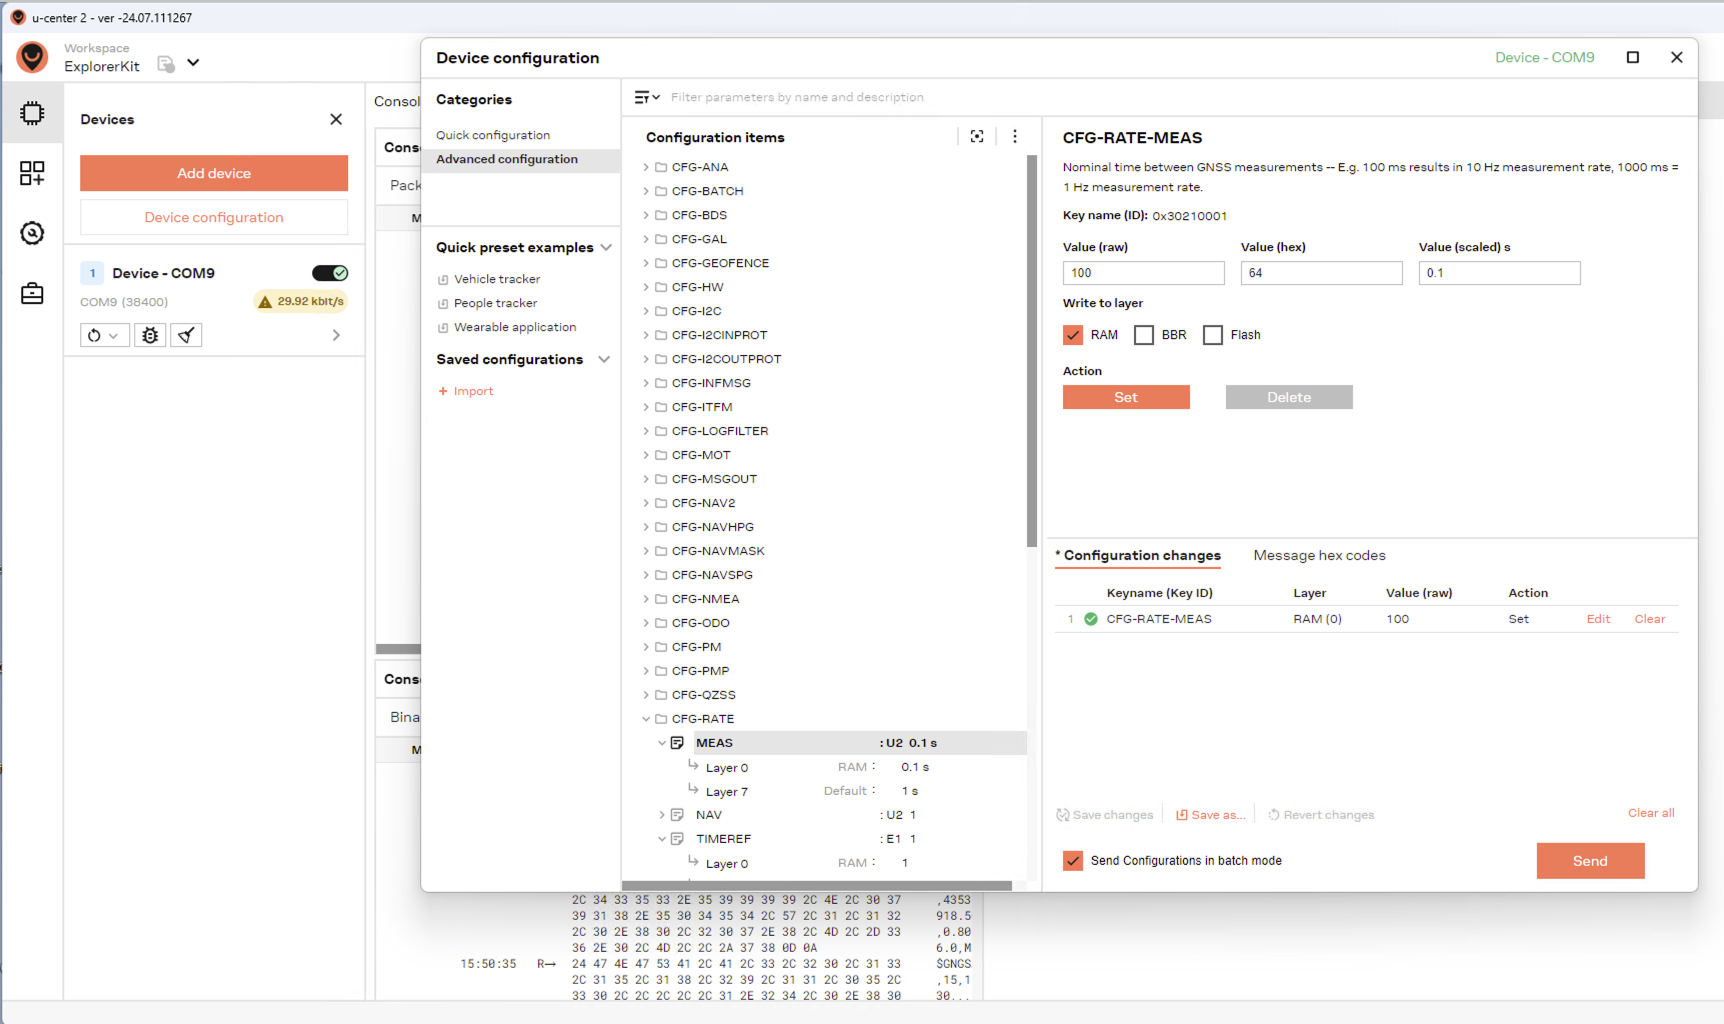
2. Under “Advanced configuration”, find and expand the “CFG-RATE” section in the configuration tree.
3. Select “MEAS” (Measurement Rate), as shown in the screenshot you provided.
Step 4: Set the Update Rate
1. In the “CFG-RATE-MEAS” section, you’ll see fields for “Value (raw)”, “Value (hex)”, and “Value (scaled)”.
•Value (raw) corresponds to the measurement period in milliseconds.
•For example, to set a 10 Hz update rate, set the Value (raw) to 100 ms.
2.After entering the desired value, you have the option to write this configuration to different layers:
• RAM: Stores the configuration temporarily until the device is powered off.
•BBR (Battery-Backed RAM): Stores the configuration in battery-backed RAM, which retains the settings even when the device is powered off.
•Flash: Permanently stores the configuration in the device’s flash memory, ensuring that the settings are retained even after power cycling.
Step 5: Apply the Configuration
1.After selecting the appropriate layer(s) (e.g., RAM, BBR, Flash), click “Set” to apply the changes to the GNSS receiver.
2.You can verify the update by observing the update rate on the u-center 2 interface or by checking the output messages.
Step 6: Verify the Update Rate
1.You can monitor the GNSS data to confirm that the receiver is now operating at the desired update rate.
2.Check the output in the “Message View” or any other relevant data display in u-center 2 to ensure the update rate is correct.
Step 1: Install and Launch u-center 2
1.Download and install the latest version of u-center 2 from the u-blox website.
2.Connect your GR-U01 GNSS receiver to your computer via USB or serial connection.
3.Open the u-center 2 application.
Step 2: Connect to the GNSS Receiver
1. In u-center 2, go to the “Devices” tab or the connection panel.
2.Select the correct COM port where your GNSS receiver is connected.
3. Click on “Connect” to establish communication with the GNSS receiver.
Step 3: Access Configuration View
1. Once connected, navigate to the “Device configuration” panel by selecting it on the left side of the interface.
2. Under “Advanced configuration”, find and expand the “CFG-RATE” section in the configuration tree.
3. Select “MEAS” (Measurement Rate), as shown in the screenshot you provided.
Step 4: Set the Update Rate
1. In the “CFG-RATE-MEAS” section, you’ll see fields for “Value (raw)”, “Value (hex)”, and “Value (scaled)”.
•Value (raw) corresponds to the measurement period in milliseconds.
•For example, to set a 10 Hz update rate, set the Value (raw) to 100 ms.
2.After entering the desired value, you have the option to write this configuration to different layers:
• RAM: Stores the configuration temporarily until the device is powered off.
•BBR (Battery-Backed RAM): Stores the configuration in battery-backed RAM, which retains the settings even when the device is powered off.
•Flash: Permanently stores the configuration in the device’s flash memory, ensuring that the settings are retained even after power cycling.

Step 5: Apply the Configuration
1.After selecting the appropriate layer(s) (e.g., RAM, BBR, Flash), click “Set” to apply the changes to the GNSS receiver.
2.You can verify the update by observing the update rate on the u-center 2 interface or by checking the output messages.
Step 6: Verify the Update Rate
1.You can monitor the GNSS data to confirm that the receiver is now operating at the desired update rate.
2.Check the output in the “Message View” or any other relevant data display in u-center 2 to ensure the update rate is correct.
